As most of you have found out the hard way... the brakes on XJ's often leave a lot to be desired. Quite frankly; most XJ's brakes suck. When you add bigger tires, heavy wheels, a lift and plenty of equipment you may find yourself applying more grip to the seat with your butt than the brakes themselves will apply to stop your XJ. In fact, XJ brakes appear to have been designed solely to amuse Jeep engineers as they watch drivers trying to stop.
This mod increases REAR braking force and is primarily intended for those who have converted their rear brakes to discs. This mod may also apply to drum systems that have been altered with larger bore rear wheel cylinders (as mine was). You'll have to evaluate the results on your vehicle. Results also depend on previous modifications done to braking system. Please make sure your brake system is in PERFECT condition before doing this mod.! This mod is NOT a solution to worn out pads, leaky parts or defective equipment!
WARNING!
- This mod is NOT INTENDED FOR A.B.S. EQUIPPED VEHICLES and has NOT been tested with A.B.S.!
- This mod is not a substitute for maintanence! You should not perform this mod unless you have already went through your brake system front to back! It's the simple things that are most often overlooked!
- This mod is intended to supplement previously modified systems and not intended for stock brake systems.
If you have a modified brake system and have already went though everything listed in the -- Brakes Basics -- tech article and are still having problems with the rear brakes not applying any effective stopping power, then this mod is one you can easily try out. Best of all... it can be done in less than a couple of hours, costs less than $5 to try and can be easily reversed if it doesn't work out for ya.
Parts Needed:
- 1 can of brake cleaner.
- 16 oz can of brake fluid. (You won't use even half of this if you do mod correctly.)
- Some shop rags
- Some large pieces of cardboard to put underneath to catch spillage.
Getting Started.
This is a pretty quick & easy brake mod considering other things you should have done up to this point on your brakes. If you haven't went through EVERYTHING else in your brake system, STOP! Do that first!
The proportioning valve is located just below the master cylinder and has two lines from the master cylinder running into it. This valve divides the brake fluid pressure in 'proportion' to the force required to apply the front and rear brakes as designed. In a brake system, brake fluid does NOT just flow to all four wheels directly from the master cylinder, it must be distributed correctly in order for the brakes to function properly. Disc brake conversions, larger calipers and bigger wheel cylinders are some of the things that, when changed, alter the fluid forces needed to keep braking forces in balance.

If
you have a Rusty's Air Tube & K&N filter, this job is much easier if
you remove them. (Same for stock air box.) Here's a picture of the master
cylinder assembly showing the proportioning valve location below. This XJ
doesn't have a motor blocking your view, but you can easily reach everything
and do the mod without removing the valve (OR the motor!
![]() ).
).

You'll note that there are two lines running to
the front brake calipers and only one line running to the rear brakes. The rear
line (at far left of valve) divides into two seperate lines at the rear axle
which in turn feeds each wheel cylinder or caliper.
First off, put some shop rags below
the valve to protect your paint. Brake fluid eats paint and many plastics!
Also, some large sheets of cardboard underneath will help save your
driveway/floor some damage. Be aware that your front master cylinder reservoir
will DRAIN DRY given the chance doing this! If you work quickly, however,
you'll have the mod done before all the fluid can run out.
CAUTION! There is a stout spring inside that can shoot out taking the cap with it!
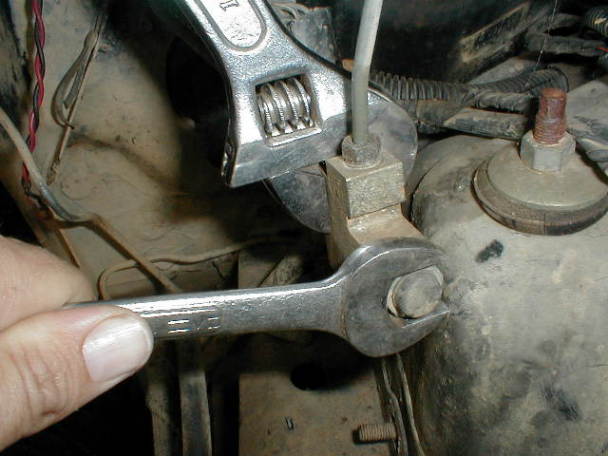
Hold the proportioning valve steady with a crescent wrench to keep it from twisting and damaging the lines and loosen the front bleeder cap. A 19mm wrench is shown on the front bleeder cap but use a socket instead! Using a firm grip on the socket will help you keep everything in place and allow you to ease the assembly apart instead of cussing and looking around for the parts. It's got enough pressure on it to shoot things right out of sight!
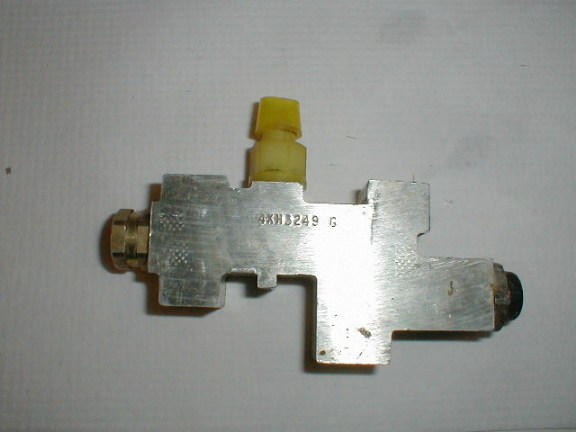
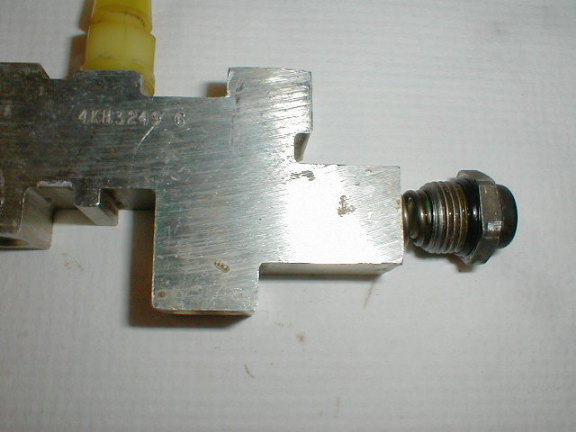
This is a view of a proportioning
valve removed from the vehicle with the front bleeder cap on your right. You do
NOT need to remove the valve to do this mod! I pulled it from a junk XJ only to
more easily photograph the procedure. (*The yellowish thing on the top center
is the brake failure warning light switch.)
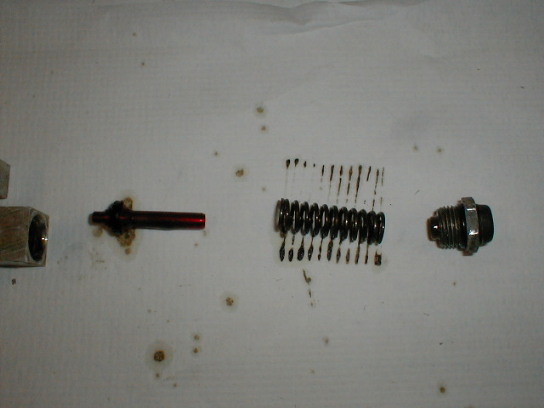
Here are the internal parts showing from Right to Left: A) -
bleeder cap, B) - spring, C) - piston/valve with flattened rubber o-ring. The
proportioning valve itself is mostly out of the picture on the far left. Clean
these parts and the opening with plenty of brake cleaner. DRY OFF any
residue before reassembly!

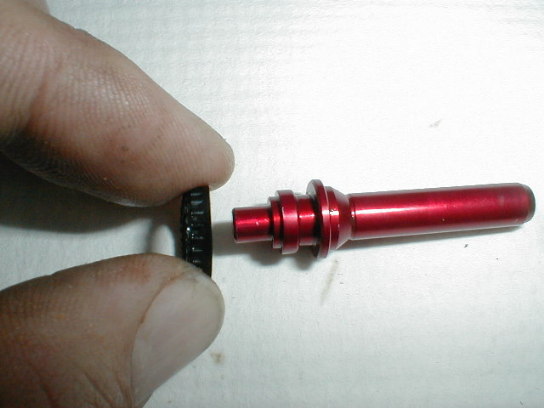
Here is a close up of the
piston/valve with the flattened o-ring. The o-ring will fit both ways but
actually installs on the piston/valve only one correct way! It is mounted
having serrations on the left side and flaring slightly on the flat right side
(as shown here). Keep this in mind as if this mod doesn't work well for you,
you'll need to reinstall this o-ring properly or your brakes will NOT work
correctly! (Can we say "News At Eleven: XJ Crash Kills and Maims
Hundreds!"?)
View showing removal/reinstallation
of o-ring. Comes off easily and should be kept in a safe place where it won't
be lost or damaged. Mine popped off the red piston and remained inside the
valve but I gently fished it out with a pair of needle nose pliars. (A small
screwdriver would have popped it out just as easily).

View of valve/piston and spring being reinserted into
proportioning valve's body. Watch the tension on that spring! It's not much,
but it'll quicly shoot the whole dang thing out in 3 different
directions!
Reinstalling the bleeder cap. Clean
off the threads without damaging the bleeder cap's o-ring seals. Getting the
cap rethreaded is a bit of a pain... so use FIRM pressure while holding
proportioning valve steady and carefully engage the threads. Don't let go until
you're sure the cap is threaded back into the valve body! Snug down with
your socket but don't fully tighten down the bleeder cap just yet.

Under this rubber cover, you'll
find the bleeder cap's nipple. If you haven't applied the brakes during all of
this, you won't have any air in the system and can just bleed the proportioning
valve itself.

A
close up of the bleeder without the rubber cover. To bleed the air out, first
make sure the shop rags are still underneath the valve. Change 'em... they're
soaked by now!
With the bleeder slightly loosened, top off the brake
fluid in the master cylinder, replace the cover and have a friend GENTLY
press and hold the pedal while ya crack the bleeder a little
bit but not too much! Remember! That spring is just dying to shoot out of
there! (Most of my fluid shot out from the threads toward the motor and didn't
come out through the bleeder itself anyhow. Go figure!) Snug the bleeder down
then have your friend let off the pedal. Repeat this procedure a few times
until no more air comes out and the pedal firms back up. Tighten the bleeder
fully holding the valve body with the crescent wrench. Don't overtorque it or
you risk damaging the valve or the brake lines! Check the fluid level again.
Your brake warning light should go out when you touch the brake now and stay
off.

If for some reason you can't get
the air to bleed out, you can try loosening the upper lines WITH THE
CORRECT SIZE FLARE WRENCH as shown and bleed the air out there but it's a major
pain to do so. Finally...if that didn't do it... then it's probably
easier to
just rebleed the whole system using a MityVac brake bleeder
(a handy little gadget to have anyhow!). You can also find these at Harbor
Freight or try renting one from AutoZone's loaner tools.
Testing time.
Try your pedal before you even
take it out of park and ensure that you have good pedal and that firmness is at
least as good as it was before. There should be little if any change in static
pedal 'feel'. Take a slow and easy test run and check out the brakes at slow
speed, gradually increasing to normal stop & go speeds. Then, in an EMPTY
parking lot, get on the brakes really hard. Try to lock them up and see if the
changes improved your braking or just make the rears lock up too easily. Once
you're comfortable with dry surface performance...You MUST also
perform these tests on gravel and wet surfaces away from other
vehicles!
Your brakes WILL behave differently after this
mod and rears will 'lock' easier in hard braking... not something you want to
learn in a panic wet stop situation!
If the rear brakes lock up too
easily, REINSTALL THE RUBBER O-RING exactly as it was before and re bleed the
system.
Double check for leaks and fluid level!
*NOTE! - You
might consider using a brake bias adjuster if you do this mod. Use the bias
adjuster to control the ratio of force applied between the front and rear
brakes!
Update
DISC BRAKE UPGRADES: When upgrading your drum brakes to disc brakes be sure to grab a proportioning valve from a disc brake equipped XJ or Grand Cherokee at the boneyard. It is a far superior solution to modifying the stock valve.
If you have pics of your own repairs or can suggest other methods - please contribute your ideas (and pictures) to this article!
|
Revised on:
November 19, 2006 |