Yup. I know. Sounds easy... and it is. Problem is, we all know someone who doesn't/won't/or can't change their own oil and are taking miles of life off their engine!
Well, don't just sit there... Go give them a dope slap and tell them to take care of it!
If you've just been sent here with a good 'dope slap' and instructions to "Change your oil or else!" then rest easy, you're going to save some coin by not paying those idiots at the local version of "ACME LUBEGUYZ" to change your oil for you. (Besides... why pay someone else to forget to reinstall the oil plug when ya can do that yourself for free? *doh!*)
What you'll need
|
| 6 quarts QUALITY motor oil. Depending on engine's miles, some people run heavier oil in summer, lighter oil in winter. I usually run 10w-40 year round but now run Havoline URSA 15w-40. (Shown here). URSA is rated for diesel, equipment & hard usage engines. Also, it did not have those crappy 'wide mouth' tops that the Havoline marketing crackheads tried on all the other weights oil so you'll spill oil everywhere. Thankfully they've gone back to normal sized spouts. | $8.03 inc. tax |
| 1 QUALITY oil filter. K&N Gold or WIX Gold are good filters. (Ya get what ya pay for).Good quality filters will not allow the engine oil to drain from the filter and back into the engine. | $7.00 +/- depending on choice. |

LET THE ENGINE COOL DOWN
until you can
comfortably work with it!
REMEMBER! ENGINE OIL WILL BE HOTTER THAN THE
MOTOR SURFACES SO BE CAREFULL!
Ok, you've got your cardboard laid out, a few rags or heavy shop towels handy, your oil drain pan is under the transmission ready to be pulled into position and the engine is warm, but NOT HOT! Locate the proper box wrench, or better yet, socket to EXACTLY fit your rig's drain plug. (I had already swapped my drain plug for a magnetic one so you need to determine your own drain plug's size).
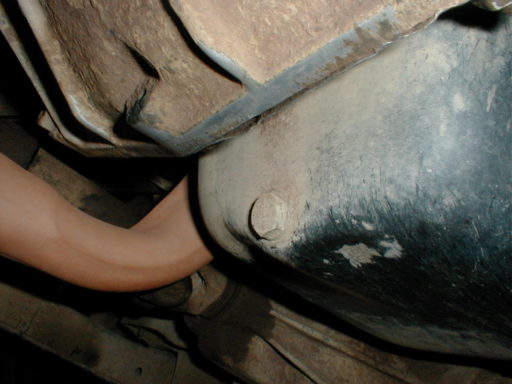
"Look ma! No rear main leak!"
Make sure the socket fits EXACTLY! It shouldn't be hard to remove but ya don't want to strip or round the head off! You shouldn't have to put a great deal of effort into removing the plug (unless some crackhead at a Lube Shop over did it...). Loosen, but don't remove the plug. Pull the drain pan up so that when the plug is removed, the oil will shoot out into it.
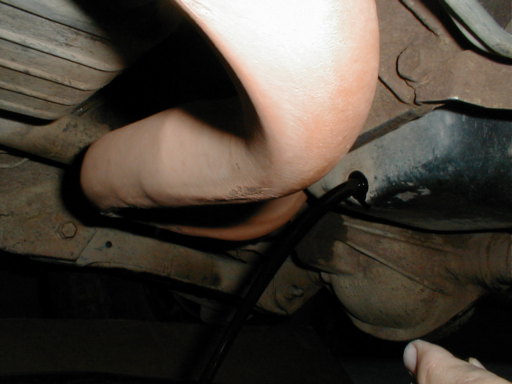
CAUTION! The oil WILL shoot out several inches away from the hole, nearly a foot in some cases so be prepared! Be prepared to handle a hot drain plug at the same time! Make sure your drain pan hole is too small for the plug in case you drop it and hang on to that sucker! (That's why the socket and not the box wrench. Sockets are good to keep it from shooting off into pan).

Like I said, oil is gonna shoot out across the entire pan at first, then slow to a trickle. Recenter the pan once it slows and then reaches a trickle. Let it drain while ya remove the filter.
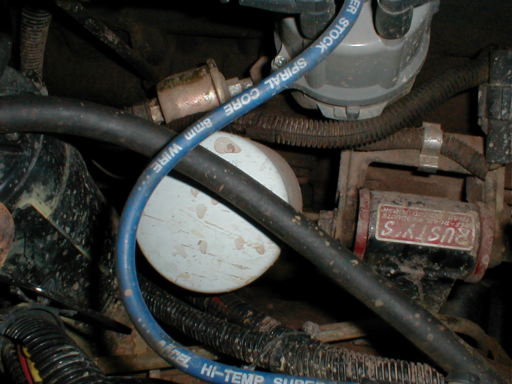
Here's the filter. It's the white canister located on the passenger side of the 4.0L engine, just behind the motor mount and beside the distributor. Your motor mounts won't look like mine (with Rusty's sticker) unless they've been swapped. Also, various brands of oil filters come in different colors.
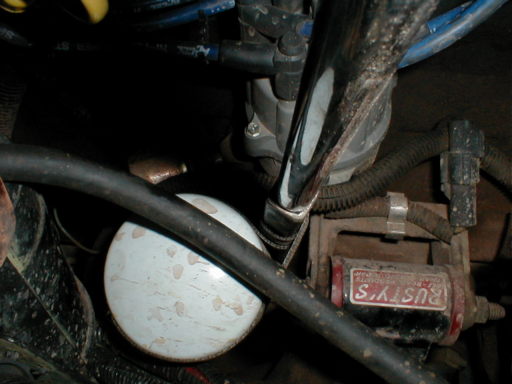
Here is a view of the filter with the strap style filter wrench on it and then an extension bar inserted into the wrench (extending up & out of picture at about 1 o'clock). If your filter won't come off easily, one of these wrenches makes quick work of it. Filter removes turning counter clockwise. Slip the old filter into an old plastic bag, or inside the new filter's box & dispose of in trash.
Take your new filter and rub a little of the old oil onto the entire filter seal ring (black rubber ring on base surrounding center hole). This will help prevent the filter from sticking and being hard to remove next time. Install your new filter until it bottoms then tighten another 3/4 turn. Check filter box for manufacturer recommendations on tightening if you have any doubts.
DO NOT OVERTIGHTEN THE NEW OIL FILTER!!!
Now for the two most important steps of the whole process...
These are the two steps that the ACME LUBEGUYZ places seem to have major problems with. Unless your career goals include putting "IDIOT" on your resume don't leave these steps out! |
Crawl back underneath and carefully replace the drain plug & washer. Tighten drain plug back down but DO NOT overtighten it! If you manage to strip out the threads (or they already were stripped) you can get replacement plugs with slightly oversized threads at the auto parts store. Remember, DO NOT OVERTIGHTEN the drain plug!
Carefully cap the oil drain pan and set aside to take to recycling center. Advance Auto and many other parts stores will accept used oil for recycling.
DO NOT BE AN IDIOT BY DUMPING USED OIL IN STORM DRAINS OR ANYWHERE ELSE!
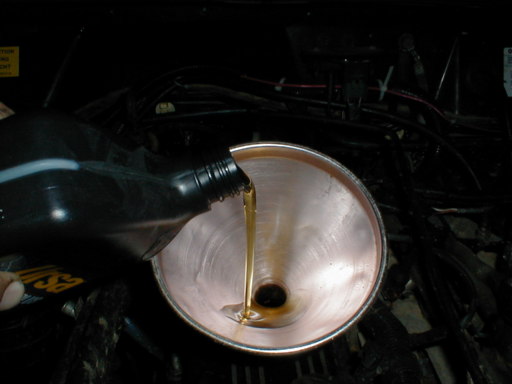
Wipe off the oil pan with a rag & crawl back out. Remove filler cap from valve cover and insert CLEAN funnel insuring that it will remain in place while pouring oil.
For a Jeep 4.0L 6 cylinder engine, carefully pour 6 quarts oil in. (5.9 quarts actually, since some oil remains in engine from previous oil but don't worry about the small extra amount).
Replace filler cap and look back underneath for leaks/seepage from oil drain plug or filter. Verify oil level on dipstick.
Crank, but do not start engine. This is just to get some oil back up to the pump through the pickup tube.
Start engine while WATCHING OIL PRESSURE GUAGE. If you don't have a guage about all you can do is listen CAREFULLY to engine for ANY unusual sounds. (No guages? Fix that here!)
Your engine should QUICKLY build oil
pressure and not make any unusual noises, rattles or knock!
If pressure is
low or ANY unusual noise is present SHUT MOTOR OFF! Double check oil level. You
would be amazed how many people forget to put oil back in the engine!
That's it! Clean up your mess and double check AGAIN for leaks!
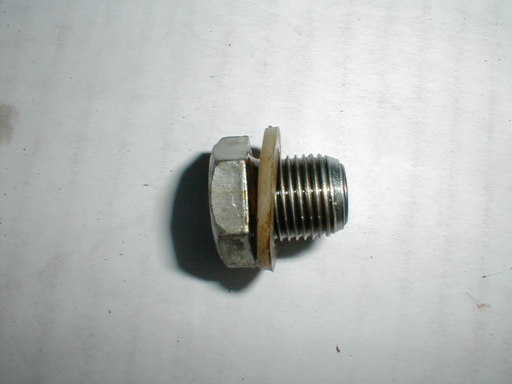
Tech Tip: Install a magnetic drain plug when you change your oil. These plugs contain a magnet which catch small metal particulates in your oil that otherwise would circulate back into your engine doing damage. You only need to buy this one time and at under $5 they are cheap protection for your motor. Checking the plug each time you change oil helps you keep tabs on the wear rate of internal parts.
Uh-oh. I screwed up!
|
Now, take the coin you saved and go buy yerself a lollypop.
And don't forget to take the used oil to a recycling center!
If you have pics of your own repairs or can suggest other methods - please contribute your ideas (and pictures) to this article!|
|
|
Revised on:
October 31, 2006 |