or
"How to keep that *%(#&$#@*+#! headliner from hanging down in your face!"
Tired of peering through a hanging jungle of tattered
headliner remains?
Do chicks shriek with fright at your staple and
thumbtack covered 'GhettoLiner'?
Are you losing friends to lung disease
as they inhale all of that fiberglass and dry-rotted foam raining down from
your pitiful excuse for a headliner?
Well, yank that sagging sucker out of
there and turn your miserable life around! Become a 'manly man' with a real man's headliner!
(Ok, yeah - you'll still be a dweeb but at least your headliner will be cool!
![]() )
)
What you'll need:
|
What's first?
First, measure the headliner backing and add about 1 foot to the width and length. If your fabric isn't wide enough, seam the material first. Yep, you might have to buy double the length in order to get a wide enough piece but there are fabrics that come in wide enough bolts to use as is. Just be sure to allow at least a foot extra length and width to allow for overlapping to the back -AND- if you decide to use cotton fabrics anyhow... allow some extra for SHRINKAGE!
All right! Get out those quarters, head to the laundrymat and WASH THE FABRIC IN HOT WATER!!! No detergent or bleach, JUST HOT WATER! Now toss the fabric into the dryer and dry it on the high heat setting because you want your material to do ALL OF IT'S SHRINKING NOW and NOT after it has become your new headliner!
Notes! (Please read!)
WARNING!
THE FIBERGLASS CONTACT CEMENT
MUST BE APPLIED OUTDOORS OR IN A VERY WELL VENTILATED AREA AWAY FROM ANY OPEN
FLAMES (PILOT LIGHTS, CIGARETTES ETC...) THIS STUFF WILL MAKE YOU HIGH AS A
KITE AND/OR BLOW YOUR STUPID ASS TO THE MOON SO READ ALL ADHESIVE
MANUFACTURER'S INSTRUCTIONS AND FOLLOW THEM!
SERIOUS WARNING HERE
FOLKS!
Measurement Notes! - Measure your headliner and add 1 foot extra width and length for your headliner fabric. This extra allows for a 1" seam (1") in the middle, over lapping the edges AND SHRINKAGE! Be aware that fabric shops sell many different 'bolts' of material and some are different widths! One 'bolt' may have material that is only 40" wide while another has material that is 60" wide. If you look around, you can probably find some material that is wide enough to avoid having a center seam sewn to make it wide enough.
Fading Notes! - My fabric was dang near florescent but didn't fade when I washed it in hot water and ran it through the dryer. PLEASE ASK THE CLERK at the fabric shop and tell her what you intend to do. Ask about the specific fabric's color-fastness ("Will it fade in hot water?") and how much it will shrink. Just explain that ya want to pre-shrink the material and ask for recommendations. Be aware that most 'normal' fabrics aren't intended to be in direct sunlight... no problem for a headliner, but if ya cover anything else and it sits in the sun, expect fading unless it's UV safe fabric.
Update - The exposed area of fabric on the sunvisor edges has faded out but the overhead and unexposed areas are still unaffected after 2 years. A little ScotchGuard drapery UV protectant spray might have helped here.
Installation:
UPDATE! - After removing your old headliner from the backer-board, take it outside and brush it down with a generous portion of fiberglass resin (mixed per instructions) worked well into the fiberglass until it's saturated. This will turn that flimsy piece of crud into a flexible, yet rigid surface that will be MUCH easier to work with and that the fabric's glue will adhere to!!! Allow at least 24 hours for this to dry before handling and make sure you do this up on sawhorses, etc without bonding the backer-board irretrievably to whatever it's laying on. Translation: Don't glue the thing to the floor!
Ok, the backer-board is dry and you've measured your material, had it sewn if necessary and cut it to be larger than your headliner fiberglass backing. Now it's time to apply the material.
Doing this is pretty easy and the pictures are self explanatory. Hardest part is getting the old headliner out and the foam material off without destroying the fiberglass backing. Just take your time, measure everything twice and remember it can't end up looking any worse than the crap ya pulled outta there!
Be sure to read the adhesive instructions! Most should have about a 15 minute 'tack' / 'flash' time where the adhesive will become tacky and do it's job best. Too long and it'll dry up and won't stick... too soon and it won't be tacky enough to hold well either. Read the instructions and FOLLOW THEM! You'll need to apply adhesive to both the headliner fiberglass backing (1st) AND the material (2nd). Don't be afraid to lay the gel-type adhesive on a bit thick & brush it into the fiberglass... it'll suck a bunch of it up & I found through trial & error that the stuff dries clear and if ya don't use enough... (or if you use the NON-gel or spray adhesive) you'll end up redoing it. (Meaning: Lay it on thick & saturate the fiberglass and the cloth or you'll be taking the headliner off to reglue it!)
The gel-type adhesive gives you a bit more time but you still have to work fairly quickly to avoid having the adhesive dry out too much on the fiberglass; so get your helper to assist. Have your helper hold the material while applying adhesive. This gives you both an opportunity to hallucinate from the fumes. In other words... Do this outside! (Or just learn to ignore that giant mouse wearing a cowboy hat riding your lawnmower around...)
You will need your now glue addled and semi-comatose helper to help you manage the material in order to get it material laid down smoothly. You don't want to get the material's glue dirty by dragging it around on stuff while you maneuver it into place so let your helper hold up the fabric and lower it as you smooth it out and adhere it into place. If you try it by yourself you're asking for trouble and a lot of cussing. Remember all that trouble ya took in order to shrink the material?... don't stretch the material now!
You'll begin near the center and work out to both sides and toward both ends from there. If you don't stretch things, keep things smooth and lay your seam out straight you should be able to gently adhere the material up to one end and out to the corners withOUT any wrinkles or bunching up. Go for a light touch here and take your time and DON'T stretch it!
If you stretch shrinkable material when applying... guess what'll happen when when it gets hot in the sun? It'll shrink. *doh!* Then it'll pull away and fall down again. Then you'll cry like a little girl. A little girl with a headliner hanging on her head. "Waaah."
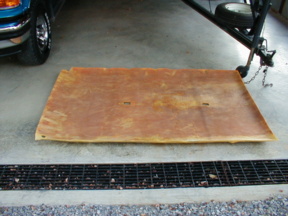 Here's a bare headliner removed from XJ and stripped of old fabric. Use a nylon bristle brush and a shop vac to remove the old foam crap. Try not to tear the fiberglass and keep the surface intact if possible. You can repair tears to the fiberglass with a piece of cardboard formed to fit and glued into place for reinforcement. Per Ron's contribution: This is the stage at which you should use fiberglass resin to turn this into a better surface to glue the fabric to. |
 I recommend using upholstery buttons which are available at fabric or upholstery shops and can be covered to match headliner material. You punch pilot holes through the headliner with the new fabric in place, insert these buttons and then spread the two 'legs' apart ( Be sure to use cardboard backing pieces to keep them from pulling through the fiberglass. |
 Watch these two clips when removing or installing your headliner! They'll catch on the fiberglass and tear it in a heartbeat! Be aware of all holes for things like shoulder harnesses, dome lights and sunvisors. You'll need to do a bit of cutting AFTER the material is glued down and prior to reinstallation. |
 Headliner reinstalled with trim panels back up. You'll need to cut out for dome lights, sunvisors and shoulder harness mounts. Keep an eye on where these holes are and be aware that the headliner has some 'play' and can be shifted a bit too much one way or the other. |
 Fabric wasn't wide enough to cover the entire headliner so a double length of material was purchased and seamed down the middle. (Thanks Mom!) And yes - those are lizards. Lots of lizards. Neon lizards. Lizards all around me... AAAAAAGH! (Now all I need is a strobe, a black light and some more fumes from that contact cement.) |
 Sunvisors were covered to match the headliner. I also installed a Shelf-It™ overhead storage shelf from JCWhitney which is handy for stowing your cb mic and other things you'd like to conk you on the head while you're bouncing around off-road |
That's about all there is to it. But if ya need more tips, check out An archived copy of Ed Steven's excellent site for more info'.
If you have pics of your own repairs or can suggest other methods - please contribute your ideas (and pictures) to this article!
|
|
|
Revised on:
March 15, 2016 |