This article is intended to help you through a fuel pump
replacement AFTER you have properly diagnosed the fuel
system problems. I don't recommend you replace your fuel pump until you
have determined that it is not providing or maintaining proper fuel pressure
and have eliminated the other simple, yet easy to overlook fuel system
problems.
Click here to diagnose your fuel
system problems!
Once you've tested the fuel system pressure and eliminated all the other issues then, and only then, is it time to make sure you get the right replacement pump for your rig. One of several different pumps may be inside your tank depending on what year your XJ is. Because of this, you will find that most aftermarket parts vendors only stock 'multi fit' generic pumps meaning that you may find it difficult to find an 'exact fit' replacement fuel pump. The easiest way to make sure you get the right pump is to pull yours and take it with you.
These are the numbers from my 1990 OEM pump:Bosch #958081001912v (927) 946-14 (USA) 3-2 8933003591 9F14 ***Yep. ALL of that was on my original pump.*** |
About $175 from the dealer for a replacement Bosch pump in
a MOPAR box!!! Whee. A genuine cardboard MOPAR box. That's worth $100, isn't it? |
Auto Zone - multi-fit generic pump#E-7996You also need to get a fuel pump 'sock' / filter that attaches directly to the fuel pump in the tank. (A new one is required for AutoZone warranty!). |
$66 for the pump plus a few dollars for the sock / filter. I don't recall the exact dollar amount for the 'sock' but it was under $75 for everything from AutoZone. |
NAPA, AutoZone and Advance all carry what they claim to be 'replacement' pumps, however these pumps are physically different than the oem pump and will look different. In some cases, they simply will not work. These aftermarket pumps include an adapter to fit it into the pump mount inside your gas tank. When I changed my pump in 2000, the fuel pump kits carried by our local auto parts stores did NOT come with the necessary adapter to hold the pump in place. However, in August 2002 I helped a friend to swap his Cherokee's fuel pump and his new pump (from AutoZone) had an adapter sleeve included which made the swap MUCH easier... AND CHEAPER!
If you don't have an AutoZone or cannot directly confirm the
part cross reference then I suggest that you pull your old pump out FIRST and
take it with you! There are several different numbers on these pumps and you
want to get the right one the first trip. Match it up against the pump at the
parts store. Make sure the adapter sleeves are all there! At
the time we changed his fuel pump in 2002 some of the replacement pumps without
the adapter were still out there. Remember that generic pumps are made to fit
several vehicles and these adapters are thrown into the box to make a "kit".
No adapter = no "kit".
No "kit" = no fit.
Find out before you
leave the store!
Getting Started.
DISCONNECT THE BATTERY! C'mon! You're working
with gas and electricity! Wear safety glasses to help keep dirt & debris
out of your eyes. Keep your fire extinguisher available just in
case.
Lift and support the vehicle with jack stands

If
you're lifted high enough, you can do this with the tires on the ground... just
be sure to set your parking brake before crawling underneath. Drain your gas
tank as dry as possible. Siphoning with a hose is a good way to get sicker than
a dog so get a siphon pump and a gas can! Several gas cans are handy if you
don't have another vehicle to pour the gas into and you have a full tank. Gas
level needs to be well below the fuel pump portal in the tank.
(For the crackhead's method of emptying your gas tank, check out theTop Ten List of stupid service manual quotes.)
Here is a view of the gas tank port that you'll
access to remove the fuel pump. Keep some rags handy to catch gas when you
disconnect the hoses from the tank. Keep dirt out of your tank and make it
easier to disassemble by cleaning up the port with an old toothbrush to remove
dirt and grime.
Don't use a wire
brush!
Here's a view with all fuel pump hoses removed and the ring
cleaned up. You can see the twist lock ring that retains the pump underneath
the tank mounted ring and around the center disc with the wiring and fuel line.
You remove this ring using a flat brass punch and firmly striking it with a
plastic covered hammer, knocking it counter clockwise. (Yeah, I know... you
don't have a plastic covered hammer or flat brass punch... Avoid anything that
will make sparks around gas fumes, ok?)
After you get the ring loose, CAREFULLY remove the pump from the tank.
DO NOT STRIKE THE PUMP FLOAT AGAINST THE
TANK OPENING!(Or anything else!)
You will damage the sending unit and
have a fuel gauge that misreads!
Also, there is a rubber 'foot' that holds the pump in place in the tank. This 'foot' goes onto the bottom of the pump assembly and can fall into the tank if you're not careful! If you're lucky and extremely careful, you won't have to drop the tank down and go fishin'... I wasn't lucky (as this overhead view of the tank proves).
Carefully set your pump assembly down on a clean surface. Here
is the pump assembly:
The large o-ring (hanging loose) is the tank sealing ring that goes under the lock ring. Check this for damage and if it's ok you should be able to reuse it. Shown at the bottom with the float is the inlet sock filter which keeps the 'big chunks' out of the gas before it flows to your fuel filter. Replace this filter when you replace your pump! Note that there are two wires going to your pump and that they should have different sized terminals to prevent miswiring. Sketch these on a piece of paper and note which one is + positive and which one is - negative and tag the + positive lead with a wire tie to help your memory if necessary. Disassembly is an easy process at this point... , remove the fuel inlet 'sock' filter, unhook the wires, remove the nut & lock washer then lift the pump from the pump mount. Note that there are two rubber vibration isolators; one at each end of the pump. Your replacement should have these in addition to any needed adapter sleeve.
The pump shown closest to you was just one of my attempts at
finding a pump to fit my XJ. This "replacement" pump for my XJ didn't even come
close to fitting the gas tank's pump mounting bracket. Same story with pumps
carried by Advance Auto & Auto Zone. None of the pumps that local parts
suppliers carried or special ordered were close enough to the OEM pump to use
without modifying my pump mount. As you can see, there is quite a bit of
difference between aftermarket pump and OEM pumps (beside box).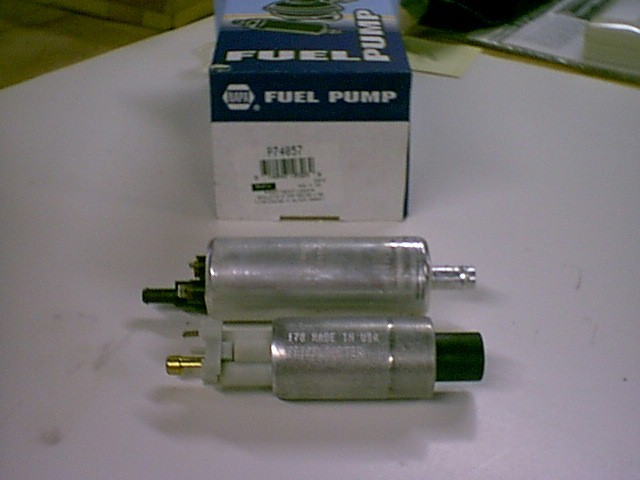
Not shown here is the EXACT fit pump I eventually ended up going to the dealer to buy. That was around $175! (My wallet still hurts... well, the pain is kinda close to my wallet anyhow.)
$175?! NO WAY!
Don't despair! Of all places... Auto Zone comes to the rescue! When we recently installed a pump on a friend's XJ, he got a pump from Auto Zone for under $75 which also covered the required fuel pump 'sock' filter. The Auto Zone pump had the needed adapters to fit the factory pump mount without modifications to the mount itself. (There must have been more than one person returning the *(!@($@#) pumps that wouldn't fit before!)
The fuel pump kits that are available today SHOULD come with the
proper adapters to fit aftermarket pumps to the tank pump mount and have the
correct adapter with it. Just check to make sure everything you need is in the
box BEFORE you leave the store! Make sure the pump will fit your mount and/or
has any adapters needed to adapt the pump to the proper length to fit your pump
mount. (That's why taking your old pump with ya is a good idea!)
Sorry! No picture of the actual adapter on my friend's pump but this shows where it goes.
The Auto Zone pump also had adapters for hooking up the wires... BE SURE TO USE THEM IF INCLUDED! They keep you from having to splice wires making hook up a 'plug & play' operation. Just be sure that the wires are securely isolated and that they will NOT contact any other surface! Do NOT overtighten these brass nuts! (The terminals are VERY fragile!) The Auto Zone kit's adapter surrounded the terminals pretty well, but care was still needed to make sure everything was seated right.
Reassembly is pretty straight forward once you get the pump remounted on the tank mount. The hardest part was figuring out how the adapter fits onto the pump along with the isolators but that was actually pretty simple. Snug down the nut with lock washer to hold everything in place and make sure your hoses and wires are reconnected from the pump to the top of the pump mount.
Put the inlet 'sock' filter and rubber 'foot' back on and prepare for re installation.
Hold that o-ring up near the tank port area of the pump mount during installation and BE CAREFUL WITH THE PUMP ASSEMBLY! Gently install the pump back into the tank being sure to keep that stupid foot in place. Don't worry, it'll pretty much go right into place on the bottom of the tank if you're careful.
Holding the mount in place, reinstall the locking ring. Be careful with the o ring! I used a bit of grease on mine to keep from twisting it under the lock ring, but that's not really necessary if you're careful. Make sure it's seated properly and that the locking ring is fully clockwise against the stops.
Reconnect fuel pump wire harness and hoses, checking for dry rotted hoses and bad clamps. Replace as needed. Zip tie wire harness and hoses in place as needed.
Reconnect the battery and turn ignition switch to 'run' position. You should hear your fuel pump crank up long enough to build pressure then pump should shut off. Check for leaks.
Start it up & check for leaks again.
Clean up yer mess!
If you have pics of your own repairs or can suggest other methods - please contribute your ideas (and pictures) to this article!
|
Revised on:
October 17, 2006 |