Factory motor mounts are prone to dry rot or stress tears in the rubber and can leave your motor & tranny flopping around with more moves than a $10 hooker working for a $500 bill. When (not if!) your motor mounts crap out you can easily replace them with stock replacements, and that is perfectly fine for most applications, but add a high torque motor or big tires and you're risking doing this job twice. More than one of ya have seen someone's radiator chewed up by a fan after a broken motor mount let the motor shift or a tranny that broke loose and dropped the driveshaft. Keep in mind, your motor generates ALL the power that moves your rig and it MUST be firmly anchored in place in order to transfer that power to the wheels. That's where a good set of poly motor & transmission mounts can come in.
Poly motor mounts are a heckuva lot more rugged than their oem counterparts and use a polyurethane bushing rather than rubber. The downside (to some) is that this strength comes at the expense of added vibrations being transmitted to both vehicle & driver. Personally, the vibrations don't bother me one bit and are no longer even noticed after a week of driving. Just the same, you should be aware that some people fuss about poly mount vibrations and immediately remove them to install stock replacements. Whatever... (I guess if you bought your XJ expecting a soft Cadillac ride then ya should click the back button now, sell your XJ and buy a Lincoln Town Car 'cause it'll never ride that way anyhow).
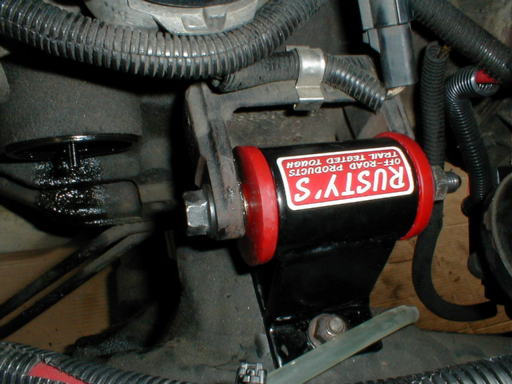
Take a look at Rusty's mounts and you'll quickly see that they are much beefier than the stock units and are well designed. Both left and right mounts are physically identical but you'll need to slightly trim the red poly from part of the driver side mount.

Why Rusty's and not oem?
Why Rusty's mounts? Durability, strength and 10 points on the
'Cool-o-Meter'! The stock mounts disintegrated (literally) and had torn end to
end along the mounting pin bushing that runs through the mount. With future
engine upgrades expected to raise engine torque substantially I decided this
was another great excuse to upgrade while I was in there and I wouldn't have to
do it again later when the drivetrain was upgraded. Rusty's also gives ya free
stickers and we all know how important that is to every serious off roader!
![]()
What do ya need?
The usual assortment of tools; primarily a set of sockets & box wrenches, breaker bar, a good floor jack & jack stands.
Beg or borrow the following:
- If necessary, a crowbar to help maneuver the engine around to line things up
- A foot long length of 2 x 4 to go between the jack and the oil pan.
- A hacksaw, or other fine tooth bladed saw.
- A permanent marker that will mark the poly.
Also, since the oil filter needs to be removed for access you might as well change the oil before ya finish.
Get started!
Let's replace the passenger side first. It's easier to get to and once in will help hold the motor in place while you do the driver side mount.
First off, set the parking brake and disconnect the battery. You're going to be working around the battery cables & you may not want to discover the wonderful world of d.c. welding just yet...
Secondly, jack up and safely support the front of your vehicle with jack stands to give ya crawlin' room underneath. Then move the jack underneath the oil pan and place the block of wood between it and the oil pan. GENTLY SUPPORT THE ENGINE!
CAUTION! You can damage your oil pan
if you're not careful!
You are NOT TRYING TO LIFT THE ENGINE! Just lift the
jack enough to support the engine and take some of the weight off the mounts.
JUST SUPPORT THE ENGINE'S WEIGHT!!!
Locate the motor mount bolts that face both up/down bolting each mount to the frame. These are in addition to the large single bolts running though each mount. The large bolts will also be removed.
With the engine securely supported, remove the nut from the large single bolt running though the motor mount rubber. Leave the bolt in place for now. You'll may need a breaker bar and PB-Blaster (or WD40) to break the nut loose but mine came loose pretty easily.
Once you have the large bolt's nut off, remove the nuts from both the lower and upper mount bolts. Remove the long bolt now. You may need to raise the motor about 1/2" or so... the motor should tilt toward the driver side since that mount is still in place. BE CAREFULL! Keep an eye on things and don't overdo it, all ya want is to get enough room to pull the old mount out and slip the new one in.
Here you can see the stock mount at the lower right corner. In addition to the long bolt running through the center of the mount; you need to remove the two nuts bolting the mount to the frame. One is on top and the other is on the bottom and must be removed from beneath.

The passenger side mount is a simple in & out swap. With the engine up just enough to remove the mount, pull the long bolt and remove your old one. Drop the new one into place and slip the long bolt through the new mount. Thread it's nut on and seat, but don't tighten it. You should already be lined up but just to be sure, make sure the two motor mount bolts line up with the holes (upper & lower) and gently lower the motor, thread the two nuts on & snug down.
Now for the driver side.
Wait until you pull the old one... but when you get the driver side mount out you need to trim the driver side's poly bushing. This is in order to fit it inside the mount cradle on the driver side of the engine and is the only problem I had with installation.
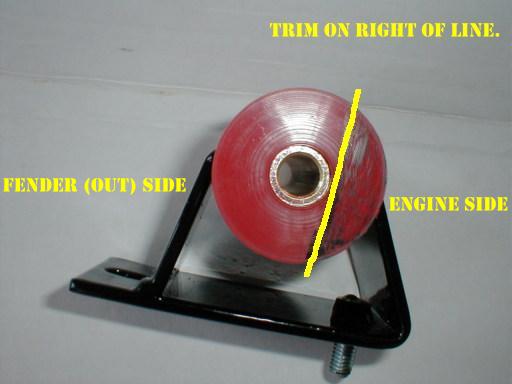
Trim a little bit at a time at BOTH ends of the bushing on the side facing the engine. You need to trim off about 1/3 to 2/5 of the 'lip' area of the mount (from the center bolt sleeve out) depending on which end you are trimming. You'll only need to trim the area to the right of the yellow line drawn in below. Even with the trimming, I still used a bit of axle grease to get it into place. Remember! Don't do this until ya are ready to mount it so ya can trim a little bit at a time! The two ears are NOT trimmed exactly the same! The forward (radiator side) ear was trimmed at a different angle and more material was removed.
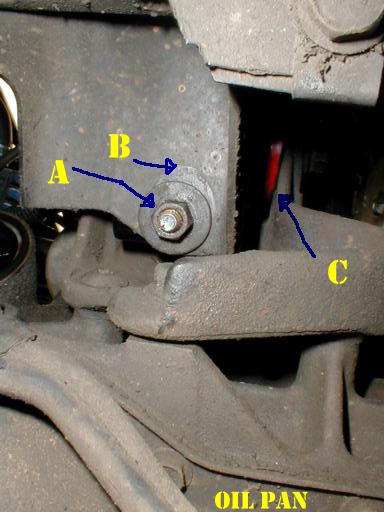
Driver side mount is a bit tighter to get to. You'll probably find it MUCH easier to remove the airbox (or air tube) to gain free access. This view is from the bottom looking up, "A" shows the lower motor mount nut, "B" shows the outline of how far my old mount had allowed the motor to shift while "C" shows the lip of the poly mount from beneath.
Shift the jack over to the driver side of the pan and reposition wood to protect pan. Lift jack enough to support engine as before. Remove nut from long motor mount bolt then remove both nuts from mount bolts. Remove long bolt and (if needed) lift engine slightly as before. Remove old mount. Look inside engine's cradle (for mount) and note protrusions from casting. Test fit new mount noting where protrusions meet poly bushing. Note centerline of cradle where long bolt goes through and compare to bushing centerline for same long bolt. Mark where you'll need to trim poly bushing. Test fit and trim a little at a time until you can slip it in... I used a little grease to slip it into place.
Insert the center bolt and thread the nut on as before. Make sure the two mount bolts are aligned and lower the engine into place adjusting as needed with crowbar. Thread on nuts for both bolts.
Remove jack from oil pan.
IF NEEDED, use a crowbar to center engine using bolts and holes as alignment points. (See the photo further up page showing old bolt alignment).
Tighten up all bolts and nuts to specs. Lower vehicle and reinstall air box & anything else removed earlier. Install a new oil filter. If you are changing your oil, do that now either way don't forget to check oil level and replace any lost oil during filter removal.
Hook the battery back up & double check everything prior to start up.
Here is the new mount in place on the driver's side. You can see the nearest 'lip' of the poly bushing and how it's trimmed.

That's it. Pretty easy to do and you'll never worry about motor mounts again!
If you have pics of your own repairs or can suggest other methods - please contribute your ideas (and pictures) to this article!
|
|
|
Revised on:
October 12, 2006 |