Sooner or later it's gonna happen to ya... You'll go outside and
see a big ol' puddle of oil in the driveway under your XJ. With the Jeep 4.0L
it's usually one of three things: the rear main seal, a leaky valve cover
gasket or bad oil filter mount seals. Since you're looking at this page we're
going to assume you've checked your valve cover gasket and your rear main isn't
the problem. (Yeah.... right....) (Ok - we'll assume your rear main seal isn't
leaking THIS bad.)
After ya check the rear main & valve cover gaskets and
you find gobs of oil on the side of the engine around the oil filter... it's
not time to panic. This is a no-brainer and won't set you back but a few
dollars. For a few bucks and maybe an extra hour (or less) added to your oil
change you can fix this easily. The problem is the oil-filter mount o-rings are
well known for getting brittle with age & heat so if your Jeep has a few
miles on it they will eventually give up the ghost and leaks develop around the
oil filter mount.
Let's Get Started!
Note! There are a couple of different o-ring styles.
|
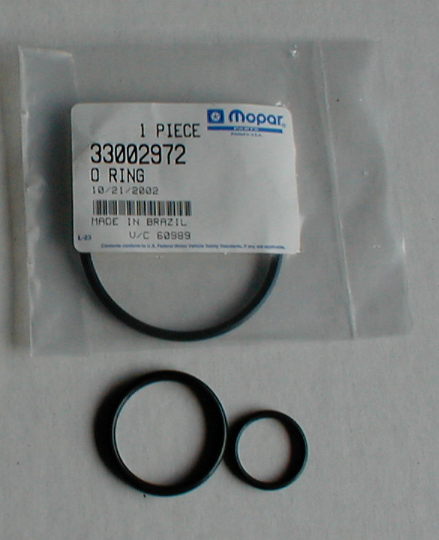
HO engines have an o-ring 'kit' available w/ all three
o-rings packaged together so in this regard... you're in luck! Just go to the
dealer and ask for the "kit" with the o-rings together and you'll be ready to
go. Getting the o-rings isn't much easier than that! The hard part will come
when you start cussing that TORX bolt holding the filter mount on.
|
|||||||||
|
Early / RENIX engines require that you buy all three o-rings seperately as they do NOT interchange with the HO o-rings. This is due to the different center bolt (TORX vs. hex head) that retains the filter mount. No big deal - they're a stock item for the dealer. These o-rings may be available at your local auto-parts store as well - they aren't anything special but you must have the correct sizes to prevent more leakage! Here are the dealer part numbers and sizes for the RENIX o-rings:
 |

This
is a early 4.0L mount which you can remove with a box end wrench.
Be
aware that newer models usually have a T-60 TORX head fitting that is more
difficult to access. SOME of you may also find allen head bolts here.
A
note on tools here: Newer XJ's with the Torx & allen-head style bolt are a
bit of a pain to remove but not bad with the correct tools.
Don't try to fudge on tools here... you NEED the correct size torx socket if
your bolt has a torx head!
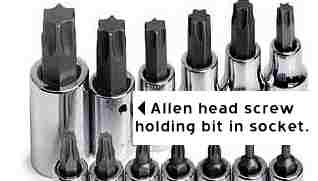
S & K Tools (and others) make a T60
sockets with the Torx bit held inside by an allen screw that you can loosen to
remove the bit.
The cheapest ( and nearly useless ) versions will be one
piece... (DON'T get the one piece socket-bits!).
The next step up
will have the bit -pressed in-. If you get the ones that are pressed in, you'll
have to pound them out with a flat punch & a hammer as they aren't really
intended to be separated. You may end up ruining the socket but it's the bit
you're really after here.
Best is the high-grade ones where you can loosen
an allen screw and remove the bit anytime. Either way, once you have the bit
out, you just use the hex part with it's torx end inside of a box-end wrench
(10MM???) which gives you enough room to work where the socket-bit won't fit
with a ratchet.
|
|
|
 SOME XJ's may have 9 / 16" allen socket head bolts. You'll need to find an allen bit socket for these but be sure to get one where the bit is removable. You can also cut down a standard allen wrench to about 1 1/2" in length. (Short enough to leave in bolt head and still remove bolt and filter mount.) You'll insert either the bit, or the cut off allen-wrench into a box end wrench and use it to remove the bolt. |
Update: Posted by tsc on J.U. - "I have a 92 ZJ
4.0 that was a very large allen wrench.... Not all of them were
Torx."
Yay. Yet another variation of the Three-Stooges
mentality down at Daimler-Chrysler to warm our hearts while lying on our back
in a mud-puddle on a 33* day trying to figure out why the tool that fixed one
XJ won't fix another...
Be aware that engine swaps from ZJ's etc are
common and you might end up with an allen bolt here... and that some XJ's
appear to have had the allen bolt as well.

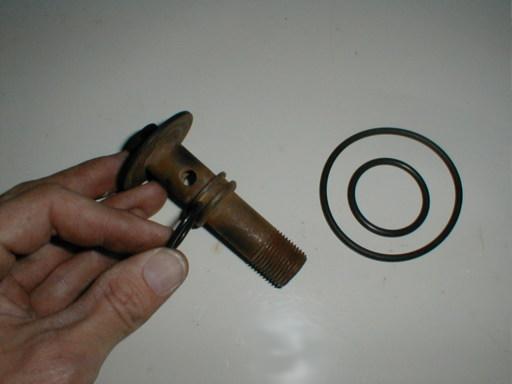
Disassembled
mount showing old seals that were so brittle they had snapped in two upon
removal.

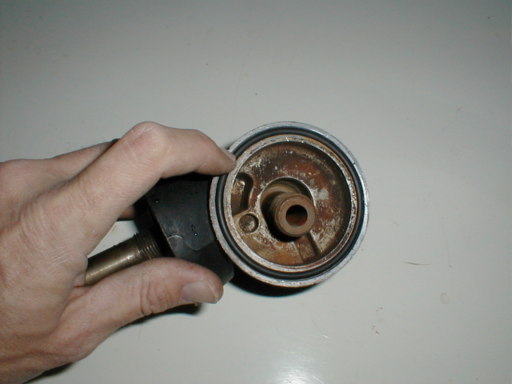
Cleaned
up the mount & repainted it. New o-rings shown on left.

Smallest
o-ring goes here.

Middle
sized o-ring goes here.

Bolt
with smallest o-ring fits inside mount with medium o-ring like this. I used a
small amount of oil just to slip them together.

Largest
o-ring goes here. Hold it in place with some axle grease inside the o-ring's
seat. Make sure it stays seated while you replace the mount and doesn't get
pinched. Do NOT overtighten the mount's bolt specs for your type bolt.
Again: Get the correct o-rings for your mount! If your filter mount uses the Torx style bolt you will need the 'kit'; if you use a box-wrench to remove the center bolt you'll have to get the o-rings seperately and they MUST be the correct size!
If you have pics of your own repairs or can suggest other methods - please contribute your ideas (and pictures) to this article!
|
|
|
Revised on:
March 6th, 2007 |

