CAMshaft Position Sensor / Sync Pulse (Stator) Test
This article is intended to help you diagnose intermittant ignition problems that cannot be attributed to other sensors or the more failure prone Crankshaft Position Sensor. The CAM-shaft position sensor (aka 'stator' or sync pulse generator) lets the ECU know when to pulse the fuel injectors and co-ordinates with the Crankshaft Position Sensor for engine timing.
|
WARNING!: The term CPS is most often used to describe the CRANKshaft position sensor! Be SURE to get the correct sensor! Both the crank and cam position sensors work together feeding the ECU (computer) information on the engine timing to fire the injectors and maintain engine timing. In the case of the Jeep 4.0L engine: the CAMshaft position sensor is also called the 'sync pulse generator' (or stator) and can be found in the "distributor" while the CRANKshaft position sensor is located on the transmission bellhousing. (* See bottom of page.) Don't be surprised if your counter drone tries to hand you the wrong part as there are several common names in use for the Camshaft Position Sensor:
|
HO Distributor
 The HO distributor has a MUCH easier to replace 'stator' than the RENIX engines. No need to remove the drive gear - the Camshaft Position Sensor (aka: stator or sync-pulse generator) is easily removed from the top once you remove the rotor from the distributor. If ya can't handle replacing the HO 'stator' then ya probably should keep away from butter knives and other complex technical items. |
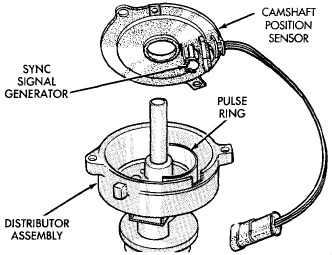
RENIX Distributor 1987 - 1990
 |
 |
This is an overhead shot of a RENIX Jeep distributor. The 'pulse ring' is the cover shown obscuring the stator itself. The stator mounts beneath this pulse ring. It is necessary to disassemble the distributor by pulling the drive gear to remove the pulse ring and then gain access to the stator. |

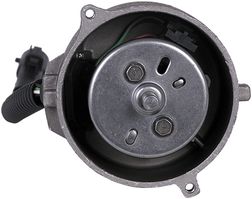
This is a
view of an aftermarket, OEM style replacement RENIX stator. |
Stator Test Procedure
Sync Pulse (Stator) Test: Do NOT disconnect your "distributor" to do this test! Backprobe the connectors by inserting the voltmeter's probes into the connector where the wires enter the connector from the distributor or harness! You'll have to make sure that you have good contact but it's not hard to do... the connector MUST remain connected to do these tests!

While you can check the voltages and continuity with a digital volt meter... you will also need an ANALOG volt meter (with a needle... not digital readout) to check the stator's function.
RENIX TEST PROCEDURE
|
Was it bad?
If your stator tested bad then Click Here to Replace Your Faulty RENIX Camshaft Position Sensor.
WARNING!: The term CPS is most often used to describe the CRANKshaft position sensor! Be SURE to ask for the correct sensor! Both the crank and cam position sensors work together feeding the ECU (computer) information on the engine timing to fire the injectors and maintain engine timing. In the case of the Jeep 4.0L engine: the CAMshaft position sensor is also called the 'sync pulse generator' (or stator) and can be found in the "distributor" while the CRANKshaft position sensor is located on the transmission bellhousing.
 CRANKshaft position sensor ... this is NOT the CAMshaft position sensor. Do Not Confuse the CAMSHAFT position
sensor with the CRANKSHAFT Position Sensor (CPS... aka: CKP) shown above! |
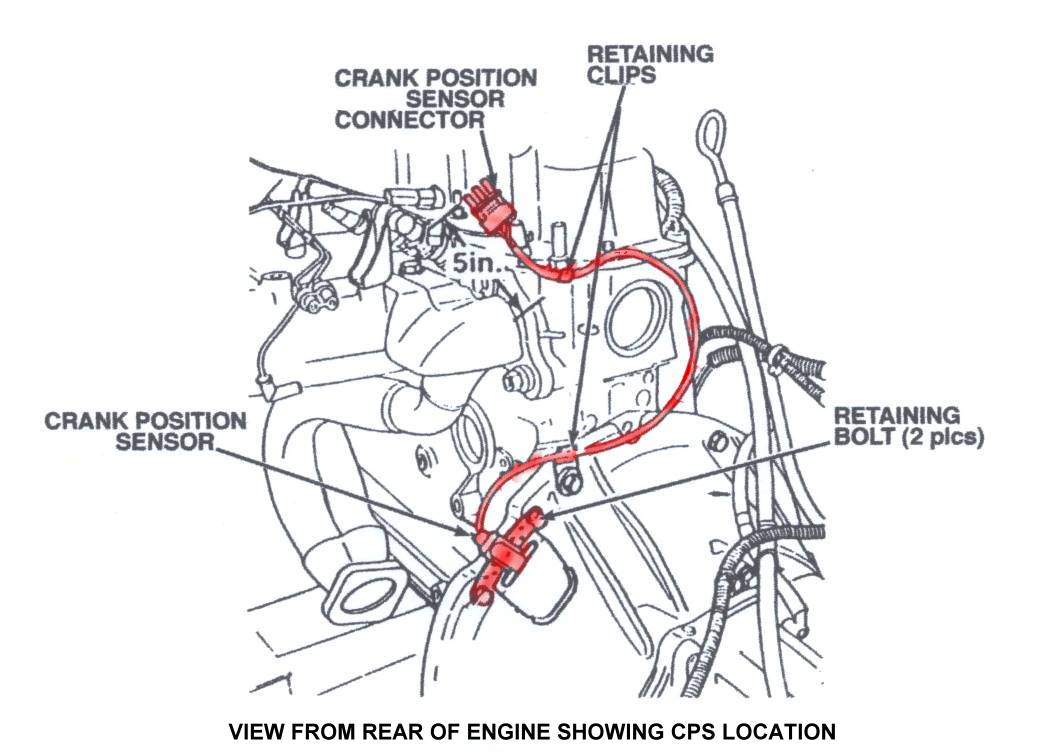 CRANKSHAFT Position Sensor (CPS...
aka: CKP) is located on the transmission bellhousing! |
If you have pics of your own repairs or can suggest other methods - please contribute your ideas (and pictures) to this article!
|
|
|
Revised on:
June 6th, 2007 |