Dump those wimpy reverse lights!
Tired of squinting while trying to back up with the puny stock reverse lights? Time to fix that and light up your rearend at the same time!
My stock reverse lights never were very bright to begin with and after years spent squinting while backing up, I finally checked things out with a voltmeter. When I did this, I found that I only had 9.6 volts going to them! No wonder they were so dim! The simple fix would be checking accessable harness connections and adding a ground jumper to help get the voltages closer to 12volts which brightens them up a bit. Check your bulb voltages out but don't be surprised if your voltages are low too. This is not really surprising when you take into account years of oxidation to harness connections and chassis grounds and the innumerable connections along the harness that are strung along the length of the body. No sweat though! We're going to just use the stock light circuit to control our add-on rear view retina burners!
|
You should be aware that if you wire these up to an
auxiliary switch you will be able to turn these rear halogen lamps on at any
time! |
What do ya want?
There are a couple of things to consider before ya start. First,
do you want the auxiliary back up lights to come on ONLY with the stock reverse
lights or do you want to be able to switch them on ANY time as well? Being able
to switch them on at any time gives you the ability to use them as 'cargo
lights' when hooking up trailers or working behind your rig at night.
Secondly, where do you want to mount them? Just be sure that they'll be
out of harm's way and not where the casual passerby will contact them if
they've been on and are hot. Consider also that an encounter with a tree stump
can break, or drive them into the body of your rig if you don't plan their
location well. Take a few minutes to consider your mounting options and
location.
Those are decisions you'll have to make so I'll just cover
both ways of wiring the lights up and leave mounting locations to you. I'll
provide a few pics of my lights to help you along. Your situation will be close
enough to mine to grasp the general idea.
|
Note: The manual switch circuit REQUIRES the listed diodes to prevent shorts due to OEM harness interconnections with the Neutral Safety Switch and the Transmission Control Module. If you use the manual control switch you MUST use the diodes! EITHER WAY YOU WIRE THIS MOD REQUIRES the listed relay! Your stock back-up light wiring harness is NOT capable of running hi-wattage lights for sustained periods and tapping directly into it for hi-wattage lights WILL FRY YOUR WIRING! USE THE RELAY! |
What you'll need.
Tools to beg or borrow:
|
Parts for lights that work with back up lights AND are switchable:
| General Purpose Automotive Relay | Under $5 at Advance Auto |
| * TOP MOUNTED * Lighted Rocker or Toggle Switch (single pole, single throw) |
About $4 at Advance Auto |
| 2-pack of Rectifier Diodes 3 amp, 400volt Radio Shack # 2761144 |
$1.49 at Radio Shack |
| Halogen or other driving lights
that will suit your application. Check out Northern Hardware - Item# 18816 - 1 pair of lights for $9.99! Click here for a direct link to these lights on their website. |
|
* - Top mounted (surface mounted) switch was used for MY application. You'll need to determine what kind of switch you want to use.
 Left to Right - Relay, diodes, rocker switch. |
 Northern Hardware lights, Item# 18816 are a bargain at $9.99! Click here for a direct link to these lights on their site. |
Here's the basic schematic for wiring your lights up WITH the
manual control option:
A few tips for those who may be a bit inexperienced with electronics or wiring.
|
Parts for lights that work ONLY with back up lights:
|
Yup. Fewer parts and a bit easier to wire. If all you want is a set of extra lights that turn on when you back up then this is the way to go. Pretty much self explanatory, this circuit connects the relay to your reverse lights (as above) but does NOT include diodes or a manual control switch.

|
Note: The manual switch circuit REQUIRES the listed diodes to prevent shorts due to OEM harness interconnections with the Neutral Safety Switch and the Transmission Control Module. If you use the manual control switch you MUST use the diodes! EITHER WAY YOU WIRE THIS MOD REQUIRES the listed relay! Your stock back-up light wiring harness is NOT capable of running hi-wattage lights for sustained periods and tapping directly into it for hi-wattage lights WILL FRY YOUR WIRING! USE THE RELAY! |
Get Started!
Switch Location.
Just make it convenient to use and where it won't be damaged by accident.
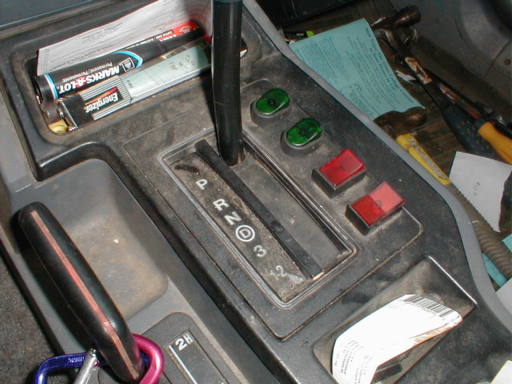
In my case, I have mounted several switches on the cover surrounding the shifter to control rack lights, tranny control etc. This location is harder to set up due to the shifter needing plenty of room to operate. If you do mount your switches here you MUST CAREFULLY ROUTE all wires and space your switches up high enough to clear the shifter mechanism! The shifter needs plenty of room between it and your wires and switches or you'll be cutting wiring up with the shifter and possibly interfering with the shifter's operation! No sweat, this is only one of many places to mount your switches, or you can just use the switch panel usually included with most fog light sets.
If you want center console mounted switches without the hassle of interference issues... Craig has a neat installation idea for switches that will allow a more 'trouble free' installation. His idea uses rocker switches in a small add on switch panel that looks like a factory installation. Check out his idea for switch mounting here.
Remove your driver side tail light lense.
Use a 10mm socket and extension to remove the lense assembly. Carefully tilt it away from the body and you should have enough slack in the wiring to lay the lense flat on top of the bumper, or a cardboard box set up at the bumper.

Locate your oem back-up bulb. Set the parking brake, or better yet, have a friend hold the brake and shift into reverse long enough to locate the correct wire. (Do NOT leave the vehicle out of park!) Now trace back the positive (hot) lead going to the center of the bulb's base and select a location to splice into. A digital volt meter comes in handy if you have difficulty here. Just find the power feed going TO the bulb. Mark it with some labeled tape if you need a little help keeping track of things.

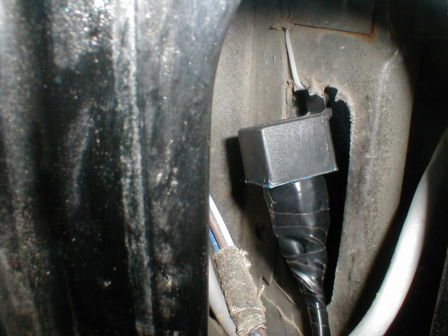
You can splice into the circuit a couple of ways. One is to strip a bit of insulation from the oem back-up light supply wire and solder the connection. Another is to use a crimp-on wire splice/voltage tap. Since this is not a sensor circuit and this connection will be well protected from the elements, I used a crimp on voltage tap. I wired up the relay and diodes were soldered into the circuit as shown in the schematic. I then wrapped both the relay terminals AND the diodes with heat shrink tubing and some electrical tape. You can't see the diodes in this picture but they're inside that bit of extra thick tape going to the left most terminal of the relay. The diodes don't care if they're close to the switch, close to the relay or close to each other just so long as they're wired properly.

Double check that everything works then wrap everything up for a few inches down from the relay to protect the diodes from damage should the wires get yanked by accident. I fed the new wiring inside and just zip tied the relay into place for my mounting location. Location shown is visible through the tail light lense opening on the back.
Mount your lights!
I chose to mount my lights on the 'ears' of my air tank bumper. You can mount them wherever it is convenient and safe, even up on your roof. Just take the time to properly route wiring away from potential damage and mount the lights where they won't get broken or burn anyone. I fed the 'hot' lead over from the other light by running it underneath the plastic trim where the latch is mounted in the cargo area floor and fed it down by temporarily removing the tail light lense.
 Old Harbour Freight lights... Big & clunky... but cheap! Plastic housing & mounting sucks though. |
 New Northern Hardware lights. Fit beneath stock light assemblies, all steel & are just as bright as the crappy H.F. lights. |
UPDATE! Northern Hardware lights... $9.95 for the pair!
Just mounted these to replace the big ol' clunky
ones from Harbour Freight. These are a bargain at under $10 for the
pair and with my bumper they fit PERFECTLY beneath the rear light
assemblies and are out of the way!
Pictures don't do this mod justice, you'll just have to see it for yourself when you do yours. In my case, the clear lense driving lights I used appear 2x as bright as the stock headlights! Wattage is the same as OEM headlights (only 55 watts each) but these lenses don't have the 'waffle' design that helps disperse the light for oncoming traffic making them real retina burners if you're not careful!

That's it! Start backing up everywhere ya go now that it's easier to see where you've been.
In the interest of keeping those with attention deficit disorder alive... I'll repeat it again, just to make sure:
|
IF YOU TURN THESE ON WHEN ANOTHER DRIVER IS
BEHIND YOU THEY WILL BE UNABLE TO SEE THE ROAD AND MAY CRASH! |
If you have pics of your own repairs or can suggest other methods - please contribute your ideas (and pictures) to this article!
|
|
|
|