A BRIEF OVERVIEW ON SWAPPING RADIATORS
This article is not intended to give detailed installation of a new radiator but instead is meant to help ya get your electric fan working with the conversion. This article meshes with and supplements original articles for doing the closed to open cooling system swap as described at Jason's website and Craig's website. I highly recommend you visit both sites to get a handle on what is involved. Hopefully, between their sites and my info you won't have any problems at all! Jason and Craig's excellent instructions helped me along the way and are a good resource to get ya started doing the closed to open radiator swap.
Most of the closed system radiators are only single row radiators but there were plenty of two row radiators in the towing package XJ's. Either way, after a few years of neglect and infrequent flushing a lot of crud builds up and greatly reduces the radiator's ability to cool properly. When, not if, it comes time to replace your radiator you can swap in an overpriced replacement radiator from your local shop/vendor, or visit http://www.radiators.com for a 3 row GDI replacement. Radiators.com has both the closed and open GDI radiators in 3 row and ya can get one shipped Fed-Ex to your door overnight! (I got mine in LESS than 24 hours from California to Virginia!)
Don't sweat it if ya haven't done this before, the closed system to closed system upgrade is pretty much a 'put it back together the same as it was before' job with the exception of heater hoses and the electric fan thermostat control when converting from closed to open. Other than that, ya shouldn't have any real problems if ya read and follow their instructions.
Speaking of heater hoses, before ya get started rounding up parts... I bought 1992 oem heater hoses for my swap instead of bulk hose as Jason did. Either way will work and having bulk hose on hand is a good idea just in case. Bulk hose is also CHEAPER than the factory hoses. I highly recommend that ya also do the heater valve conversion mentioned in their articles as it will help your a.c. be able to cool more efficiently.
A few other things to note: If ya convert to the open system, you'll be ditching the closed system bottle, the rack it sets on and possibly the heater hose assembly with it's assorted "crackhead designed" parts. Some people have rigged the closed system's 'y' pipe up to work on the open system but I found it easier just to ditch the 'y' pipe with it's hose assembly and install all the 1992 hoses and 1992 heater valve instead. When ya do this you'll find that there are some odd ball hoses that have two different sizes on each end of the same hose, so be prepared to improvise even if ya buy factory heater hose replacements. I had to trim a few hoses and spliced one hose with a Prestone Flush & Fill fitting to join the two dissimilar hoses together. Also, be sure to swap in that lower radiator hose while ya can easily get to it. Saves ya a lot of cussin' later. Be sure to swap the spring from inside the old hose to the new hose if it doesn't already have one installed. (Most don't.) This spring is used to keep the hose from collapsing as the water pump pulls coolant in from the radiator to the engine.
Swapping in a new radiator is pretty easy stuff. Just take your time and remember where things go as you disassemble things. If you run into any problems, (or better yet before ya start...) refer back to Jason's site as well as Craig's sitefor additional help & info. If you have an automatic transmission you'll have to disconnect the lines from the radiator tank on the driver's side and slip off the basket connector on the lower tranny fluid line. You just need to squeeze the connector's ears toward the line and tug the connection apart. Don't break it!... those little buggars are almost $13 from the dealer!
Maybe you won't need to do this but you'll most likely have to do some minor trimming on both ends of the top of your radiator's upper frame to allow clearance for it to fit in (if ya got a 3 row radiator). No sweat... just 5 minutes with a hacksaw and you'll be done. The screwdriver points to the cut:

Now let's pick up where their articles left off... Ok, you've got your new radiator in and your heater hoses are hooked up. Yeah, everyone else says ya can find a sensor to work, or "just splice this or that and it should work ok"... but after racking your brain at the parts counter looking for a sensor that will work properly, all ya want to know is "How the *@*&%&# do ya hook back up the electric fan now that it's thermostat switch won't mount in the new open system radiator?"
Easy.
NEW INFORMATION! UPDATE! - A Better way to do this!
| Renix /
closed-to-open system conversion update! If you'll use a late model thermostat housing intended for the factory fans switch you can use a fan switch for an '81 to '82 corvette with a 350 to control your electric fan! (The late style thermostat housing can be seen here. I have a drain petcock installed in the sensor port.) Just ask for Borg Warner part #TFS19 or Niehoff part #DR137XL. All you need to do is plug it into the late model thermostat neck, extend two wires to where your original fan switch plugged in using same method as below. This switch turns the fan on at approximately 215 and off around 195. Full Credit for finding this out goes to Avanteone (John) who posted this information on J.U. The actual text of his post is buried somewhere in the J.U. archives and is listed here only for informational purposes. No credit is claimed for finding this information! Many of us beat our heads against the counter at several auto parts houses trying to find exactly what John figured out! For more details, please go to J.U. and search for his user name and this subject. |
)
Installation: What do ya need?
| Method A Imperial electric fan adjustable thermostat #226203 (Advance Auto - about $19.00 ) |
Method B Borg Warner part #TFS19 or Niehoff part #DR137XL (Cost unknown.) |
(Common sense also tells ya that you'll also need the usual bits of wire, crimp connectors & tools that are found in most decent tool boxes.)
Let's get started
First off, disconnect the battery. I know, you're working on the cooling system... "What could go wrong??? Why disconnect the battery?" Yeah, it might sound stupid... but you are working with the electrical system here and if you have half the bad luck I do then you'll thank me later! (Think XJ bar-b-q! You'll see why later! Just do it, ok?) While you're in there, disconnect and remove the electric cooling fan.
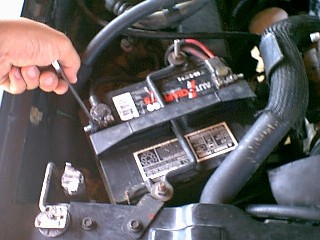
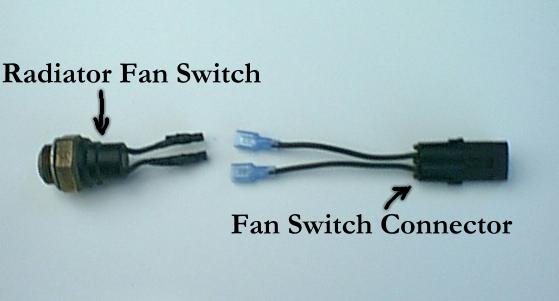
Here ya can see the OEM radiator-mounted coolant temperature sensor/switch (shown on the left) for the electric fan that I removed and saved from the old radiator. Clip the sensor's lead about 1" from the switch and add two crimp-on terminals to the pigtail connector shown on the right.
Doing this will easily allow you to connect the new Adjustable Thermostat right into the stock wiring harness without needing any further splicing or running additional wires. The crimp-on terminals are supplied with the Adjustable Thermostat kit.
Here you can see how I've located the temperature sensing bulb for the Adjustable Thermostat.
The bulb is held in place by a pull through 'zip-tie thing' included with the thermostat kit that you'll push through the radiator fins which in turn uses a small 'p-shaped' Adell clamp to hold the sensor bulb firmly in place. (All shown in picture.) I also placed the bulb behind the metal strap that connects the upper and lower radiator supports together. The tiny tubing from the sensing bulb follows along the main fan shroud to the lower radiator support where I also tucked it into the area between the bottom cooling fins and the lower support. Just make sure it isn't going to get crimped or sucked into the fan! Note!: You'll have to feed this bulb and tubing to the radiator from the locations shown in the following pictures! Make sure you finish mounting the bulb after routing and prior to putting everything back together. (Having your electric fan come on perfectly... and then perfectly eat your new thermostat bulb would really bite.)

Here you can see the bulb sensor tubing running parallel to the wiring harness from upper right to lower left. I fed the bulb and tubing along the harness from next photo location and gently fished it out along the lower transmission fluid line to the radiator. I then ran it beneath the radiator and to the final mounting location shown in the previous picture. CAUTION!:Make sure you unwind the sensor tubing -gently- and that you have your final location and routing figured out and confirmed prior to attaching the bulb, tubing or thermostat!. You'll have -just enough- tubing to spare to make it look like it was made for this application but not any extra! Just be careful where ya run things and triple check before attaching everything. (Note! - If you look real close at the wiring harness running from top to bottom you'll see a small burn/melt mark... Remember that & I'll tell ya later how to avoid a bar-b-q while doing all of this!)

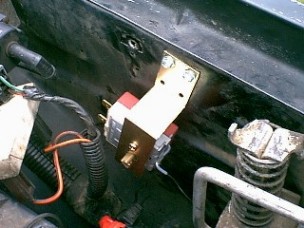
On your driver's side fender wall right at the hood latch & spring there is a ceramic resistor mounted with one bolt to the inner fender well. I temporarily removed this because... the friendly folk at the Jeep factory accidentally did something right and have already drilled two holes that will PERFECTLY mount the temperature sensor bracket!
Shown in this picture, the ceramic ballast resistor is the white blocky thing with orange wires on the left. (You can see the ballast's single mounting hole just to the left of the new thermostat's bracket.) Look carefully and you can also see the sensor bulb tubing running from the adjustable thermostat unit's lower right hand side (seen just near the hood spring/latch). The control unit itself will not fit through whereas the sensor bulb and tubing will, so ya hafta fish the bulb and tubing down to the radiator through the same hole where that large wiring harness runs.
Snake the tubing so it will follow this harness from the engine compartment behind the driver's side parking light and feed it out to the bottom of the radiator. Pretty self explanatory once ya take a peek at everything under the hood. Basically, ya just get the tube to follow that large wiring harness. A zip tie or two can hold the tubing in place along the harness AFTER you finish everything. I didn't do that however since everything is nice and snug with very little slack left after properly routing the tubing.
(Note the terminals that are visible on the left side of the thermostat control. That's where the pigtail you saved from your old temperature switch will plug into and will in turn connect the adjustable switch right into the factory wiring harness with no splicing.)
Here's the final installation.
Bulb sensor tubing was routed and secured to prevent damage. The thermostat control bracket was secured with two sheet metal screws into the holes located behind that ceramic resistor. You can see where the salvaged pigtail plugs the new unit right into the factory wiring harness exactly where the old electric fan temperature sensor was plugged in before.
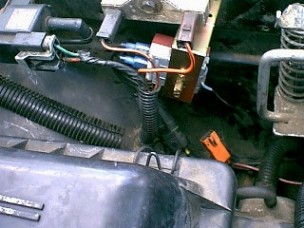
Note: I used two smaller screws than what was included with thermostat. Thanks to the holes already located there, no drilling is needed but the included screws were a bit large. The ceramic resistor is back in place after the bracket was tightened down and the clipped off original coolant switch pigtail was reconnected to it's original place in the wiring harness from the new thermostat control. Note the little orange thing visible in the lower right hand area. That is your Fan Diode assembly and not an unused plug/connector. Most likely you'll never need to replace the diode but you'll never believe how long you'll look for it if ya do. (Actually, I just wanted to prove that my XJ really had one... it took me forever to find it.)
Ok! That's pretty much it for the adjustable thermostat... Here's another view of the area where the thermostat bracket mounts taken from beside the driver side fender looking straight down. (Just visible at the lower right of the picture. The orange block at the upper left is that elusive Fan Diode again. The disconnected connector almost touching the top center of the picture is where the old factory coolant temp sensor plugged in (& where you plug that pigtail back into and connect to the new thermostat control). Air box location is just above this picture... Remember that bar-b-q warning I gave ya? Well, here's why ya should unhook the battery before ya do anything under the hood.
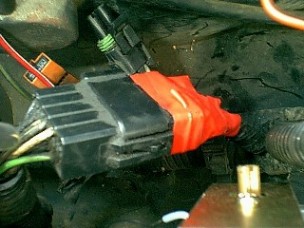
I managed to get the sensor tubing in contact with a wire terminal on this large connector ya see here wrapped in red electrical tape. Somehow, I also managed to ground out the tubing near the radiator. Guess what? Direct path from a hot voltage source to ground.
Translation: FIREWORKS! This connector has a hot lead even with the ignition switch cut off!
Fortunately, I just happened to look down to see a brightly red glowing sensor lead and a curl of smoke! I quickly nudged the connector away from the tubing but when I tried to pull the sensor tubing out to check it for damage.......
........ I discovered that I couldn't remove the sensor tubing to check it for damage! Uh-oh. What happened was that it had actually heated up enough to MELT INTO the parking light bulb holder and the plastic had encased the sensor tube! (A creative vocabulary helps at this point but won't generate enough heat to un-melt it.) So out came the Dremel rotary tool that I used to CAREFULLY remove plastic from -around- the tubing until I could pull it out. This is why I say... DISCONNECT THE BATTERY or get ready to bar-b-q something you didn't really want to replace!... like your XJ, the garage and your prized raccoon skin hat collection!
That's it! Hook the battery up, start your XJ and set the thermostat per it's instructions so that it comes on around 215* or so. Once set, forget about it! I've been running mine for over a year now with absolutely no problems.
Thanks to Jason & Craig for their great sites that got me through the radiator swap.
But most of all...
Thank You God for not burning everything to a crisp!
'Burping' Air From Cooling System.
If you have pics of your own repairs or can suggest other methods - please contribute your ideas (and pictures) to this article!
|
|
|
Revised on:
October 10, 2006 |