Jeep Cherokee Auxilliary Electric Fan Upgrade
Keep your cool crawling around off-road!
This article deals exclusively with the auxilliary electric cooling fan, NOT the primary fan. If you have cooling problems... don't jump to conclusions! Diagnose your cooling system first!
Whatsa matter? Can't keep yer cool cuzz yer electric fan quit working? Hey, mine locked up solid and got so hot it melted the flippin' fan blade completely off! Only the hand of God kept it from going into 'torch mode' before I pulled off the interstate to check out what was going on. The motor was so hot I had to strap it to the roof rack and the melted plastic fan blade (which fell completely off during removal!) smoked for several minutes after removal.
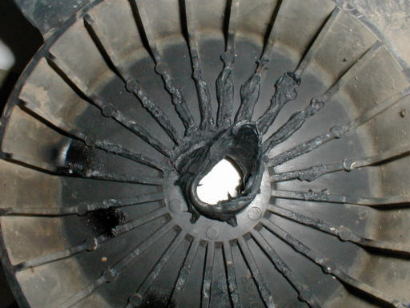
(Picture of fan where it was
mounted onto motor's shaft.)
Fortunately, I had already upgraded my cooling system to an GDI 3-row open cooling system and didn't experience any overheating problems when this happened. By avoiding use of the air conditioner the temp never crept over 215*.
While it wasn't exactly something I was itching to replace any parts failure means an upportunity for another unplanned upgrade! With this in mind, I set out to find a 10 Blade Fan from a 1996 - 2000 XJ along with it's XJ side harness plug to hook into my harness.
Six junkyards later... I found a place that could get me one the next day... and it would only cost me $125. $125!? For a used fan?!? "Uh, yeah, uh.... I'll get back to ya..." Geez! I mean, c'mon! Whole XJ's go for less $$$ on eBay!
Time for Plan B, which was a quick trip to Advance Auto for an
8-blade, multi-fit 12-inch Imperial electric fan for $63.47 with tax. Still a
lot more than I wanted to pay but it was a heckuva lot easier on the wallet!
Unfortunately, it also was not a direct drop in replacement...
A short trip back home and a few hours of relatively easy work, I was back in business with a MUCH quieter fan that moves a LOT more air than my old fan ever did!
What you'll need.
| Part | Cost |
| Imperial Electric Cooling Fan #226112 (Has 8 Blades and is reversable push/pull.) | $63.47 w/ tax |
| *Optional - 2-prong connector plug set. (I hardwired my fan but I should have installed a connector to unplug the fan with should the need arise). | Free! Save the old one from your stock fan, salvage one from a junk vehicle or just hardwire it. |
| Crimp splice connectors & crimp tool. (Soldering your connections is preferred.) | Under $15 if ya have to buy a crimp tool kit. |
I'm assuming ya have a fairly decent set of tools. A very basic set handles the installation of this fan very easily.
Things to borrow (and return!): You'll need access to a drill with a 1/4" drill bit and a digital multimeter to check voltages with.
A specialty item that eased mounting the upper fan shroud to the radiator support were some of those little clips as used on holes to give sheet metal screws something to attach to... You see them used to install speakers with quite often. Your OLD electric fan should have 2 of these where it is screwed to the radiator support at the top of the fan shroud. IF they're still there and intact... SAVE THESE for reuse in the new holes for the new fan. You may also need new screws for them.
Here's what ya get:
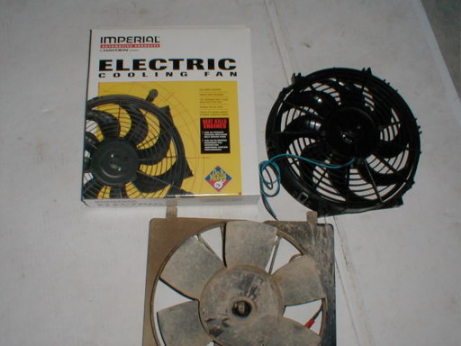
(Old fan shown for comparison. New fan upper right hand
corner.)

(Parts kit included with fan. I only used 2 of the 4
zip-tie quick connects.)
Do it!
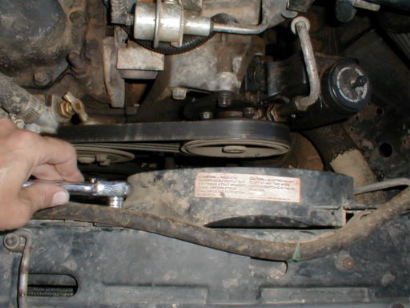
Prior to starting you should disconnect the battery! You will need to reconnect a few times to check voltages. Go ahead and pull your grille off. You'll need to get to the front of the radiators. 8 sheet metal screws hold it on... no big deal.
Remove the old fan. Unplug the fan's connector located on driver's side of the radiator (just follow the wires). My old fan had been hardwired which meant I had to clip the wires when I yanked the smoldering remains alongside the interstate exit. Either way, disconnect the fan and remove the top two screws that hold the shroud to the radiator support.
Yank the old fan. Be careful not to damage your radiator.

Old fan is gone. Check for damage while you can see everything.

New fan came set up as a 'pusher' fan, which means that it is packaged to go in FRONT of a radiator and 'push' air through the radiator.
To use as a 'puller' fan BEHIND the radiator (engine side) you will need to do two things:
- Remove the fan's retaining nut and flip the fan over per fan's instructions.
- Reverse polarity of the fan by using the BLUE wire as positive. Fan has tag on top of shroud indicating that the BLACK wire is positive (hot) and shows the direction of airflow but both are for use as a 'pusher fan' (as packaged). The instructions overlook mentioning the need to swap polarity and only address flipping the blade. Flipping the blade alone will NOT work! You MUST also reverse wiring polarity for -this- fan. (There may be diode controlled fans out there so check your instructions for warnings against reversing polarity!)

After ya flip the fan blade over, be sure it's seated on the motor's keyed shaft correctly and that this little retainer disc is oriented properly and seated fully! Replace nut and GENTLY tighten up! Don't over do it or you'll be going back trying to exchange the fan!

1/4" hole drilled in upper fan bracket locations. I did NOT use the upper bracket attachments included with the kit, only two lower ones. The upper ones aren't needed for this application... XJ radiators are too short to use this 12" fan's upper bracket attachments. Use these holes to mark your new mounting holes on the upper radiator support.

Test fitting and checking clearances ALL THE WAY AROUND! This includes underneath and BETWEEN the fan and radiator!

Close... but no moving parts are in conflict with NON moving parts. Good to go.
Mark the upper holes and remove the new fan. You might be able to drill the two holes without removing the upper radiator support but I STRONGLY urge ya to remove the support to avoid drilling a hole in your radiator. Mark your hood latch location with a nail so ya can get it back in place without too much fiddling later.

Gently clamp the support in a vice. Tap a punch to your marks to keep the drill bit from wandering and drill both 1/4" holes.

Remount the radiator support and hold it in place with one or two screws to snug it into position. Now install those sheet metal screw clips from the old fan mounting holes to the new fan mounting holes. Test fit the new fan using two screws to loose fit fan in final position.

Now take two of the brackets and install them per
instructions in two of the fan's bracket mounting holes near the bottom of the
radiator but high enough to let the quick connects go in a straight line
through both radiators.
Note! - The
instructions say DO NOT install these quick connects through both radiators...
-I did.-
It's a royal pain to separate the two radiators... so I didn't. Just use some common sense and if you don't over compress the springs then you will be fine. (Ya would really have to make an effort to screw this up...) Main thing is: Do not leave out the springs and follow the instructions on assembling these quick connects. It's easy, just don't leave anything out and DO NOT OVERTIGHTEN the quick connects!!! (Yes... I meant to say that twice!)

(Important! - Use the rubber stick on pads between the fan brackets and the radiator! Be sure to install the included springs as well as they are used to maintain tension to pull the fan to the radiator without making it rigid in case of contact between fan & radiator.) You must use these rubber pads to protect the aluminum fins!
Gently feed the quick connects through the radiators to the front.

Install the retainer rings and cinch them tight. The instructions specify to compress the quick connect's springs to no more than 1/2 their original uncompressed size. This was more than adequate to keep the fan in place.

Clip the excess. I left about 3/4" sticking past the retaining ring.

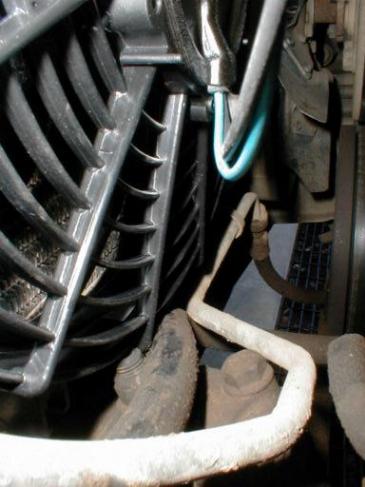
Final mounting with overflow hose reconnected, upper screws tightened, upper support reattached and wiring route chosen.

Here's where ya hook things up permanently. Make sure everything is clear under the hood and double check your XJ's hot fan lead by turning on the air conditioner and starting the motor. If it cuts on & off... don't worry! The auxilliary fan has on/off cycles that are in time with the air conditioner kicking in & cutting off. Just verify the hot lead from your harness and that voltage switches on/off with the air conditioner.
As mentioned above... When you use this fan as a 'puller' fan you must reverse the wires to make the fan motor run in the correct direction for the reversed blades. This is NOT mentioned in the instructions but you MUST do so with this particular fan. This means you will wire the BLUE wire as positive! (Reversing the wire's polarity reverses the direction a d.c. motor spins.) Reversing the wires will NOT damage the fan and you can in fact jumper the fan wires directly to the battery and double check the correct fan wire to use for positive if you have any doubts.
Double check things! Before you solder or crimp the connections... Twist the leads together, cover them with a bit of electrical tape and tuck away from moving parts. Then turn the air conditioning on to double check air flow of the electric fan. WATCH YOUR FINGERS!... This fan will pull PLENTY of air thru the front of the radiator... you'll be able to tell which way it's blowing with no problem! Hold a piece of paper in front of the radiator & this fan will snap that sucker right onto the radiator if it's wired right and pulling air through the radiator!
Don't hook up permanently until you are SURE THAT AIR FLOW IS PULLING AIR THRU RADIATOR!
I attached the new fan right to the old fan's original wires with crimp on connectors but if you saved the old fan's connector you can reuse it (or buy one at most auto parts stores). Soldering these is a good idea but isn't quite as critical as for engine sensor connections. Here you can see the fan's BLUE wire connected to the RED/WHITE "hot" lead for the oem electric fan. The fan's BLACK wire connects to the oem harness BLACK wire. (Double check your harness... don't just wire blind. Check the voltages to be sure which is which!)

After you splice the connections, wrap them with tape. If ya have some wiring loom, wrap everything with that too after butt splicing for that keen 'factory look'. Be sure to zip tie things out of the way.
I left plenty of wire in case I needed to move the fan without disconnecting it. Maybe later I'll install a connector & just be able to unplug it.

That's it! Put the grille back on and you're done! Your new fan will turn on & off exactly as the original fan did but will move MUCH more air with a lot LESS NOISE!
If you have pics of your own repairs or can suggest other methods - please contribute your ideas (and pictures) to this article!
|
|
|
Revised on:
October 09, 2006 |