Keep the rocks away from your Jeep
Cherokee's gas tank with a heavy duty skid plate.
Being prone to crunching various undercarriage parts on rocks and also having to wheel my daily driver, it was time to add a bit of protection to my XJ before I punched through something expensive. I had already added a Rusty's Transfer Case Skidplate but I wanted to protect the tranny, engine and gas tank as well. This article will cover the basics on fabbing up a hard core no bullsh*t gas tank skid that can take anything ya throw at it.
At first, I hunted for a MOPAR gas tank skid but decided to make up a skid instead since they have been discontinued by MOPAR and everyone is raiding the junkyards for them. Looking over the gas tank underneath, it was obvious that a MUCH better one could be easily constructed with minimal effort by a competent welder.
Materials List
NOTE! MEASUREMENTS ARE APPROXIMATE! MAKE ALL CUTS BASED ON YOUR OWN MEASUREMENTS!
- Get a piece of 3/16" or 1/4" treadplate (or flat plate)
about 36" x 36" square (or larger) for skid panels as follows:
8.5" x 35" - Treadplate skid - panel A. 11" x 35" - Treadplate skid - panel B. 3" x 35" - Treadplate skid - panel C. 3" x 35" - Treadplate skid - panel D.
- 24" x 24" of 1/4" flat steel plate (or treadplate) for 2
side panels (Both panels are pretty much identical except for cut out to allow
hitch wiring thru if needed):
9" x 22" driver side panel - panel L. 9" x 22" passenger side panel - panel R. - 4' of 2 x 1/4" flat stock to make skid brackets.
- 4 bolts long enough to go through hitch mount bracket
and skid mount bracket if using with hitch. Take oem nutsert
strip & bolts to your local hardware store and match up with grade 8 bolts
of the proper length to work for your application.
OR
If bolting skid on without a hitch, grab a set of factory nutcert strips & bolts used for hitch mounting if possible. Without those, you'll need to fish washers and nuts into the frame to bolt this thing up to. (Ya can tape the washers and nuts together onto a piece of cardboard with a hole punched in it for the bolt to pass through. That will hold things in place as you thread the bolt into the nut. This method is a real P.I.T.A. though...) - Note! ALL sizes are approximate! When at the scrap metal yard, get oversized pieces. This insures ya don't make another trip and you'll have the remains for another project!
WARNING!
GAS GOES " BOOM",
MAKES FIRE!
FIRE BAD! FIRE HOT! FIRE BURN!
WELDING MAKES SPARKS AND
HEAT.
SPARKS AND HEAT MAKE GAS GO BOOM!
MAKE HOUSE BURN DOWN! MAKE
FIREMAN MAD!
IF YOUR STUPID ASS IS ANYWHERE NEAR GAS WHEN IT GOES BOOM FOR
ANY REASON...
You'll be freakin' dead (or wishing you were).
TEST
FIT THEN DO ALL WELDING OFF THE VEHICLE AND AWAY FROM ANY GAS
FUMES!!!
Getting Started.
First off, I took a rectangle of cardboard approximately the same size as the side of the gas tank and a pencil outside to the XJ. Crawling under the rear to one side of the tank, I held the cardboard up to the side of the tank and just traced the outline of the plastic skid that surrounds the tank onto the cardboard. This will give you a rounded off outline of the plastic skid, which is about 1/2" or so larger than the tank. (Decision time: I left the plastic skid on and just made my skid even larger. You can pull the plastic one off if ya want, but why bother?)
Looking down at your traced outline of the plastic skid, add about 1/2" to the outside dimensions along the straight planes of the traced outline. Now take a yardstick and straighten out those curved lines into angular, flat planes that will be easy to weld flat plates onto. Those flat plates will span from one side to the other across the gas tank and be the actual skid surface. Remember! Bending steel to conform to a rounded template will be too much trouble and be a colossal waste of time. Just make the template larger than your tracing to allow room for drainage and clear the tank, straighten out the curves, cut the template out, double check to make sure it will enclose the tank without touching it at any point and you'll then be able to envision how to fab up mounting points. Since I have a receiver hitch, mine was fabbed to butt flush, that is 'edge on edge' to my hitch's frame. It is bolted into the uniframe using two of the same bolts that hold the hitch on each side which also allows me to drop the skid by removing 4 of the hitch bolts. If you don't have a receiver hitch, you can pretty much use the template "as you draw it" for making the sides and just weld some angle steel to the top where it bolts to the frame then drilling for mounting holes as needed. (Frame is pre drilled for hitch.)
After tracing the template and adding a bit for
clearance as instructed, you should have something that looks sorta like this
if you have a receiver hitch: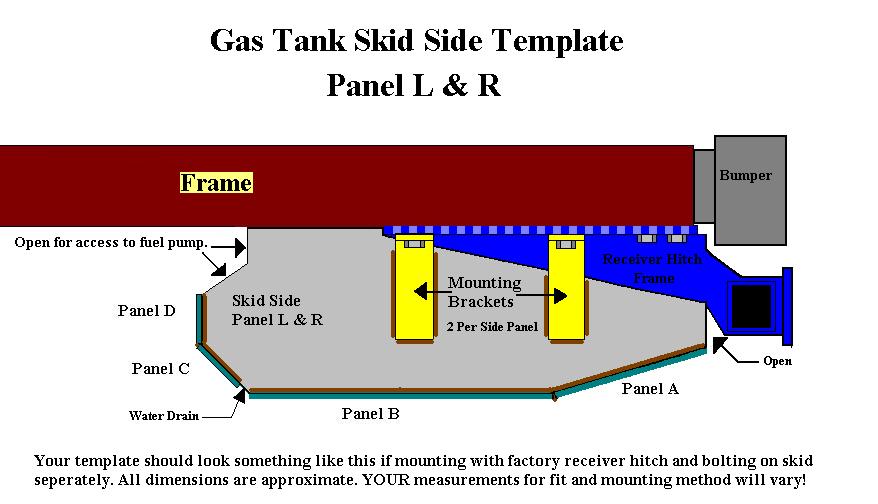
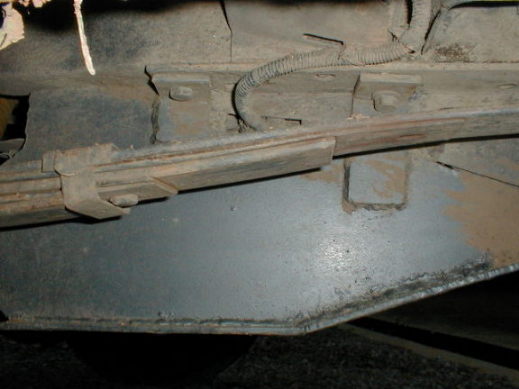
If you have a receiver hitch, you have a couple of options: You can remove your hitch and just weld the flat steel (from the template) to the inside of your hitch's frame on both sides, then weld on the flats across the tank area and reinstall. Only problem is that you won't be able to drop the skid without the hitch though! Method #2 involves tracing the edge of the hitch frame onto the template and cutting the skid sides to butt flush (edge to edge) with the hitch's frame. Then ya weld some 2" wide flat stock made into "L" brackets onto the skid sides and run those down to be bolted to the frame. That's what was done for mine as seen in the photos.
Here's a closer view of the welded on brackets that allow the skid to be unbolted while leaving the hitch in place using two of the four hitch mounting points on each side:
If you do NOT have a receiver hitch, your
template for the side plates should look more like this:
Note! The template shows brackets attached as viewed from the left (driver's) side. Passenger side will be a reversed / mirror image of the driver side template.
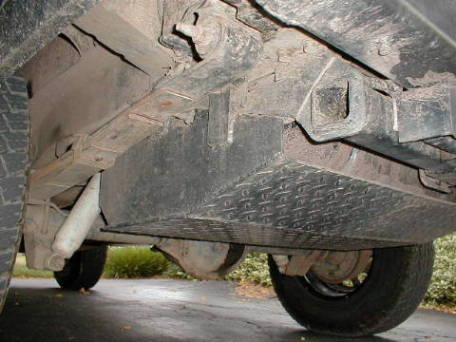
Here is a view of the oem receiver hitch / gas
tank skid mounting holes located alongside the gas tank on the bottom of the
uniframe: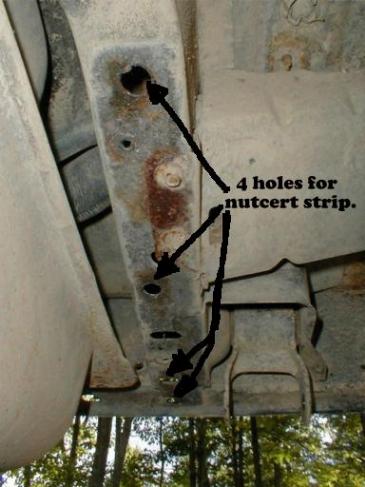
Off to the scrap metal yard!
Now, using the templates to estimate the steel needed for both sides, and having measured across the tank from outside of the frame rails, it was time to buy some flat steel for the sides and large area of the skid. I figured that 1/4" flat stock for the sides would be more than strong enough and figured I'd grab whatever 3/16" or so stock I could find for the flats across the tank. Here's where ya save yourself some change! Almost every major city has a steel recycling/scrap metal yard around. Buy everything there... plus, ya never know what you'll find while ya wander through it. I came across some hard-core 1/4" thick steel treadplate that was just begging to be made into a skid plate. Forget 3/16" stock! Yah, there was plenty of 3/16" treadplate there too but what th' heck!
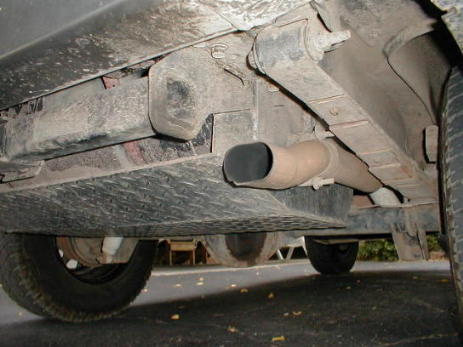
I know that the MOPAR factory skid offers pretty good protection but this 1/4" stuff is freakin' indestructible! Whack this stuff on a rock and it sounds like a church bell ringing, I have yet to dent it and it's great just aiming a floor jack at the rear center of the XJ and lifting it up without any worries. I had some clearance problems at first with the DynoMax exhaust pipe vibrating against the side of the skid but after some thought I marked the side of the skid where the exhaust ran along side and used two bolts, parts of a muffler clamp set (same diameter as the exhaust pipe) and a strip of aluminum to fab up a rock solid mount to hold the exhaust firmly in place with no more rattles. I had to remove the skid to install the exhaust bolts from the inside. I then added a nut to each bolt from the outside to keep it in place even without the exhaust clamp on it.
Here's a close up of the exhaust mount:

I also had to slightly bend the pipe to get it parallel to both the tank skid and the spring. I did this with a length of 1/2" pipe inserted into the exhaust and a bit of 'gentle' persuasion. Well worth the extra time to do this. You can see the two bolts protruding through this side of the skid, with the exhaust clamp stamped halve between the pipe & the skid capped with the strip of aluminum formed around the pipe and held on with the two nuts. I trimmed the bolts with a hacksaw to clear the leaf springs by a comfortable margin.
When you weld the flats across the bottom, don't forget to allow for some drainage and if you cover the front of the tank, use some common sense and allow room for all your gas lines and access to remove the fuel pump if needed. Last, but not least. I topped it off with a coat of primer and some RustOleum 'Hammered Metal' paint. Be sure to give the inside a good coat of primer if nothing else. For extra style points you could spend a week and paint each little tread plate dimple a different color... or maybe not. Don't forget to hose out the mud from time to time.
If you have pics of your own repairs or can suggest other methods - please contribute your ideas (and pictures) to this article!
|
|
|
Revised on:
October 18, 2006 |